
Contents
SceneSketch is a Windows app that lets you draw right on a storyboard sheet and take it all the way to a timed animatic.
- The sheet is A4 portrait with 5 rows per page. In each row, you draw in the Picture frame and fill in the action, dialogue and duration
- Each row you draw in automatically becomes a "cut" and flows into the Shot List (a table) and the Timeline (cuts in time order)
- You can export to PDF, PNG and MP4 (animatic). You can also send your cut breakdown to After Effects
This guide uses the SceneSketch 0.5.6 screens. The photos and clips show the English screens (you can change the language in Edit > Preferences…).
1Getting started
1-1. System requirements
| Item | Details |
|---|---|
| OS | Windows 11 (64-bit). Windows 10 is not supported |
| Pen tablet | Supported, with pen pressure |
| After Effects | 2026 / 2027 (when you use the After Effects link) |
| Internet | Needed only for the first activation (or to start the trial). After that, you can work offline |
| UI language | 日本語, English, 한국어 |
1-2. Installation
- Download the installer (
SceneSketch_x.y.z_x64-setup.exe) from the SceneSketch page on the download site - Double-click the downloaded file. You don't need administrator rights
- Choose the UI language (日本語, English or 한국어) and follow the steps
If you see "Unknown publisher" or "Windows protected your PC"
SceneSketch doesn't have a code signing certificate yet, so Windows may show this message. If you got the file from the distributor (Nemoharu Creative), click "More info" → "Run anyway" to continue.
1-3. First launch
The first time you start the app, you'll see the "Welcome to SceneSketch" screen. Choose one of these:
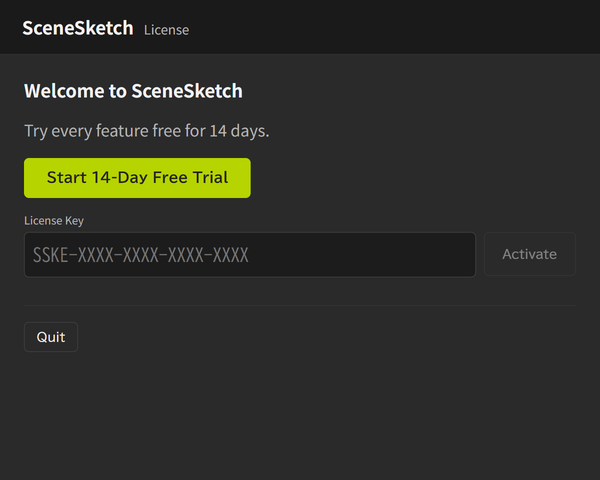
- "Start 14-Day Free Trial" — Use every feature for 14 days, no key needed
- Enter a license key and click "Activate" — Enter the key you got from the distributor (in the form
SSKE-XXXX-XXXX-XXXX-XXXX, or a short key). If you paste it in lowercase or without hyphens, it's fixed for you automatically
Both need an internet connection. If you enter a wrong key too many times in a row, keys won't be accepted for about an hour.
1-4. License and trial
Trial
- You can use every feature for 14 days
- During the trial, "Trial: N days left" appears at the top right of the screen and on the start screen
- You get one trial per PC. Reinstalling or setting the PC clock back won't extend it
- When the trial ends, your projects stay as they are. Enter a key to keep using the app
Full version (activated with a key)
- Even during the trial, you can enter a key from Help > License… (or by clicking "Trial: N days left") to switch to the full version right away
- One key works on up to 2 PCs
- Once activated, you can usually use the app without an internet connection. Activation lasts 30 days and renews automatically when you're online
- If you stay offline so long that it expires, you'll see "Couldn't verify your license". Connect to the internet and click "Check Again"
- If the check passed when you started the app, you can keep saving and exporting until you close it, even if it expires while you work
The license screen (Help > License…)
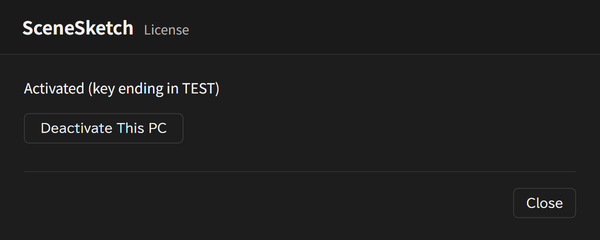
It shows the activation status (only the last 4 characters of the key) and a "Deactivate This PC" button.
Moving to another PC
- Save your project first
- On your current PC, open Help > License… and click "Deactivate This PC"
- When asked to confirm, click "Deactivate Now". SceneSketch quits
- Start SceneSketch on the new PC and activate it with the same key
If you try to activate a key that's already used on 2 PCs on a third one, it's refused with "This key is already in use on 2 PCs".
1-5. Updates
When a new version is out, a notice appears at the bottom right of the start screen right after you start the app. After you open a project, it also appears at the bottom right of that screen.
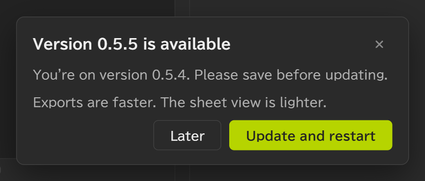
- "Update and restart" — Downloads, installs and restarts automatically. It skips any versions in between and goes straight to the newest one. Save before you click it
- "Later" — Closes the notice. It appears again the next time you start the app. Nothing is installed without your OK
- To check yourself, choose Help > Check for Updates… (if there's nothing new, you'll see "You're using the latest version.")
- You can see your current version at the top right of the start screen (such as
v0.5.6) - Update files are signed, and any file whose signature doesn't match is not installed
2Start screen
When you start the app, the start screen appears first. If you started it by double-clicking a .sske file, that project opens right away.
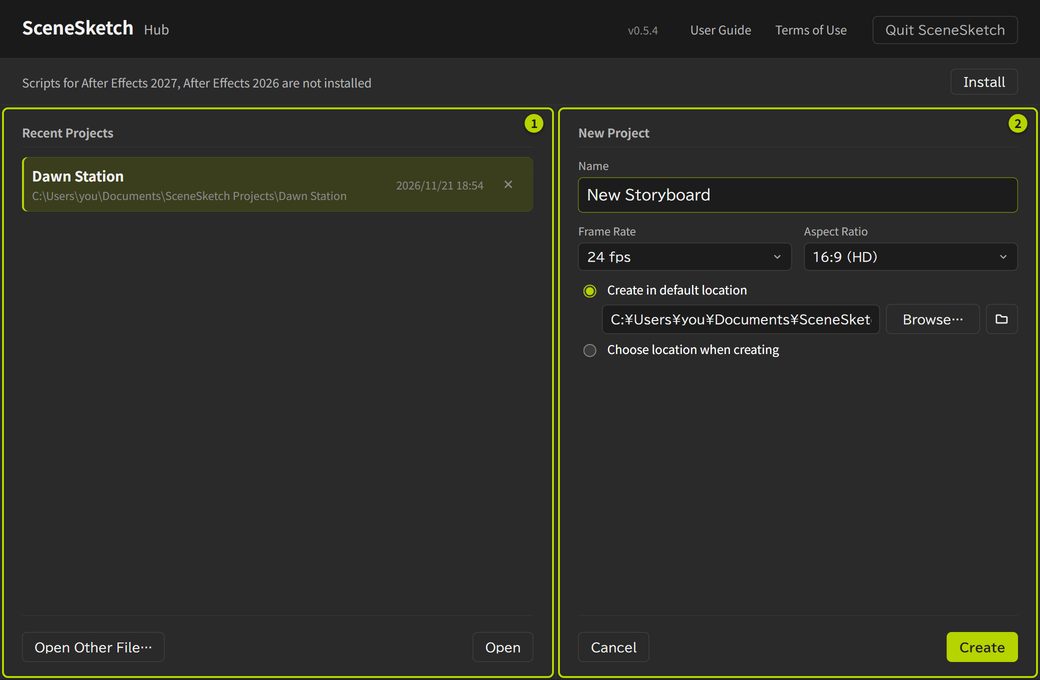
① Recent Projects
- Click a project to select it, then double-click it (or click "Open") to open it
- Click the × on the right to remove it from the list (the file is not deleted)
- Projects that were moved or deleted show "Not found"
- For anything not in the list, use "Open Other File…"
② New Project
- Enter a Name (this becomes the name of the project folder and file)
- Choose a Frame Rate (23.976 / 24 / 25 / 29.97 / 30 / 50 / 59.94 / 60 fps)
- Choose an Aspect Ratio (16:9 (HD) / 2.35:1 / 2.39:1 (CinemaScope))
- Decide where to create it
- Create in default location — At first this is
Documents\SceneSketch Projects. You can change it with "Browse…", and it's remembered for next time. The folder button on the right opens that location - Choose location when creating — Asks you for a location every time
- Create in default location — At first this is
- Click "Create". The project folder and the
.sskefile are created right then, and the sheet opens
You can't change the aspect ratio after you create the project. It sets the shape of the Picture frame. You can change the frame rate later (7. Project settings).
Top bar
- User Guide / Terms of Use — Open those pages
- Quit SceneSketch — Quits the app
- A notice about the After Effects scripts may appear here (10-5)
You also get this start screen when you choose File > New Project… (Ctrl+N) after opening a project. In that case, click "Cancel" to go back to the project you had open.
3Screen layout
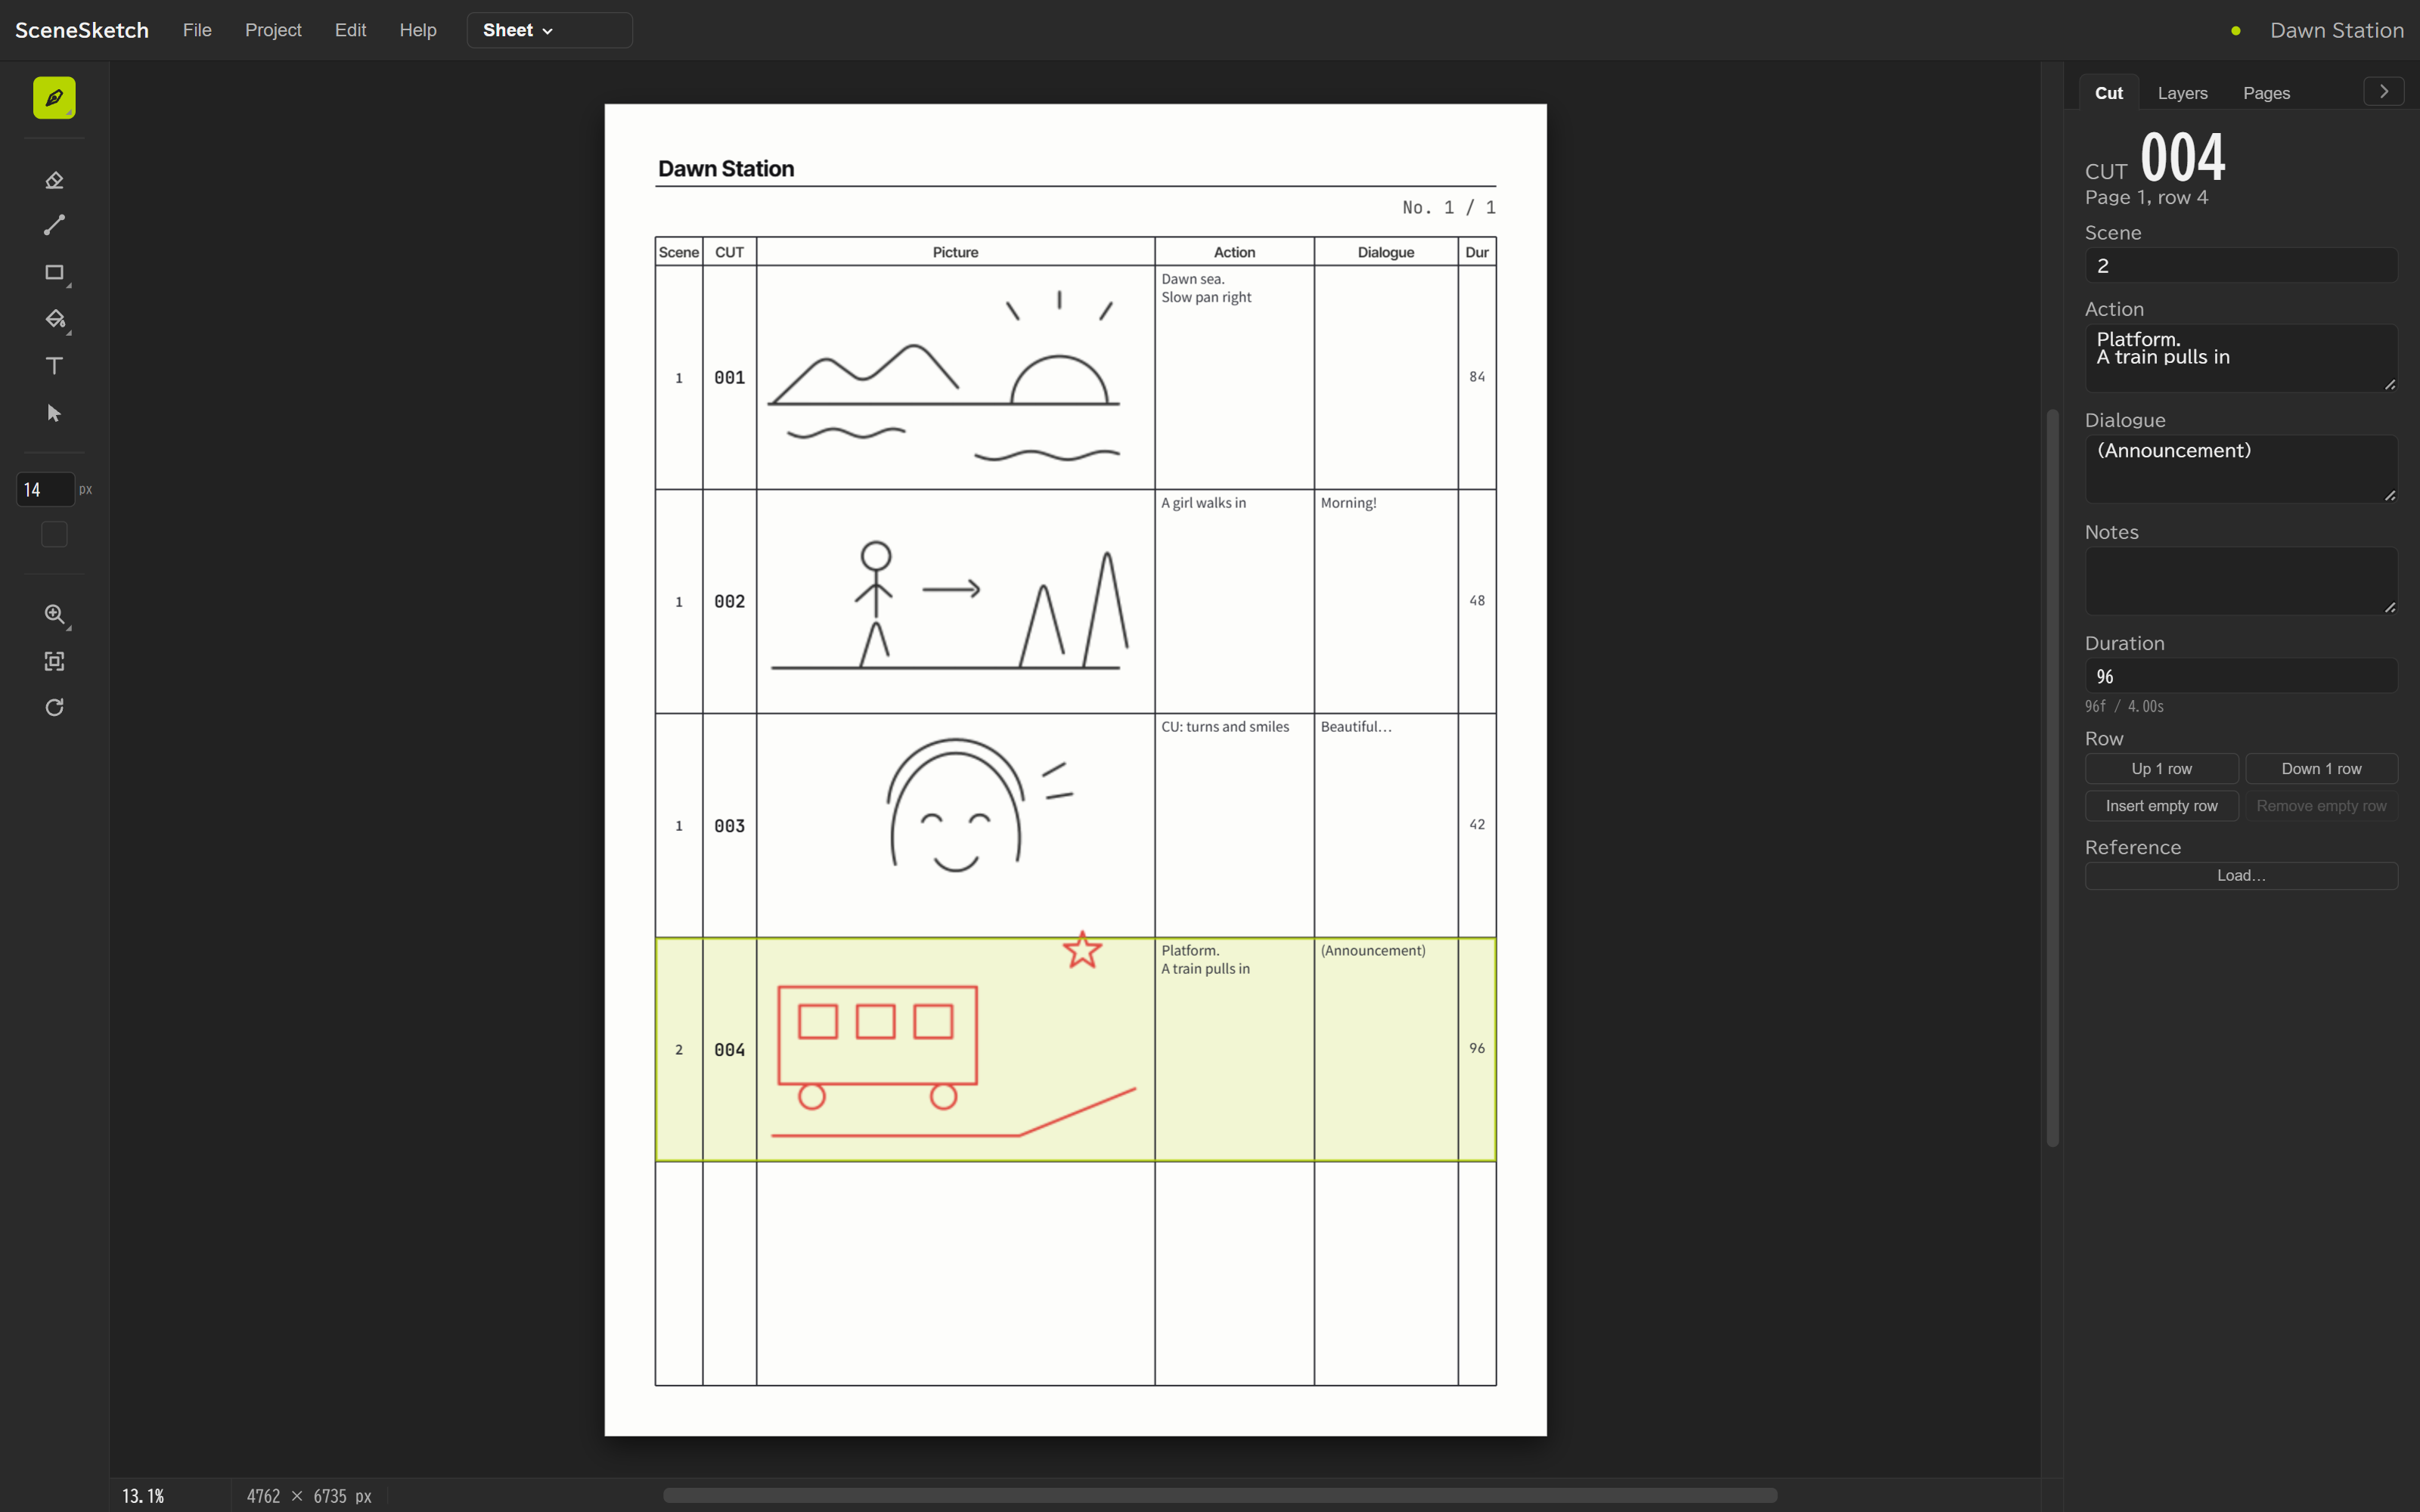
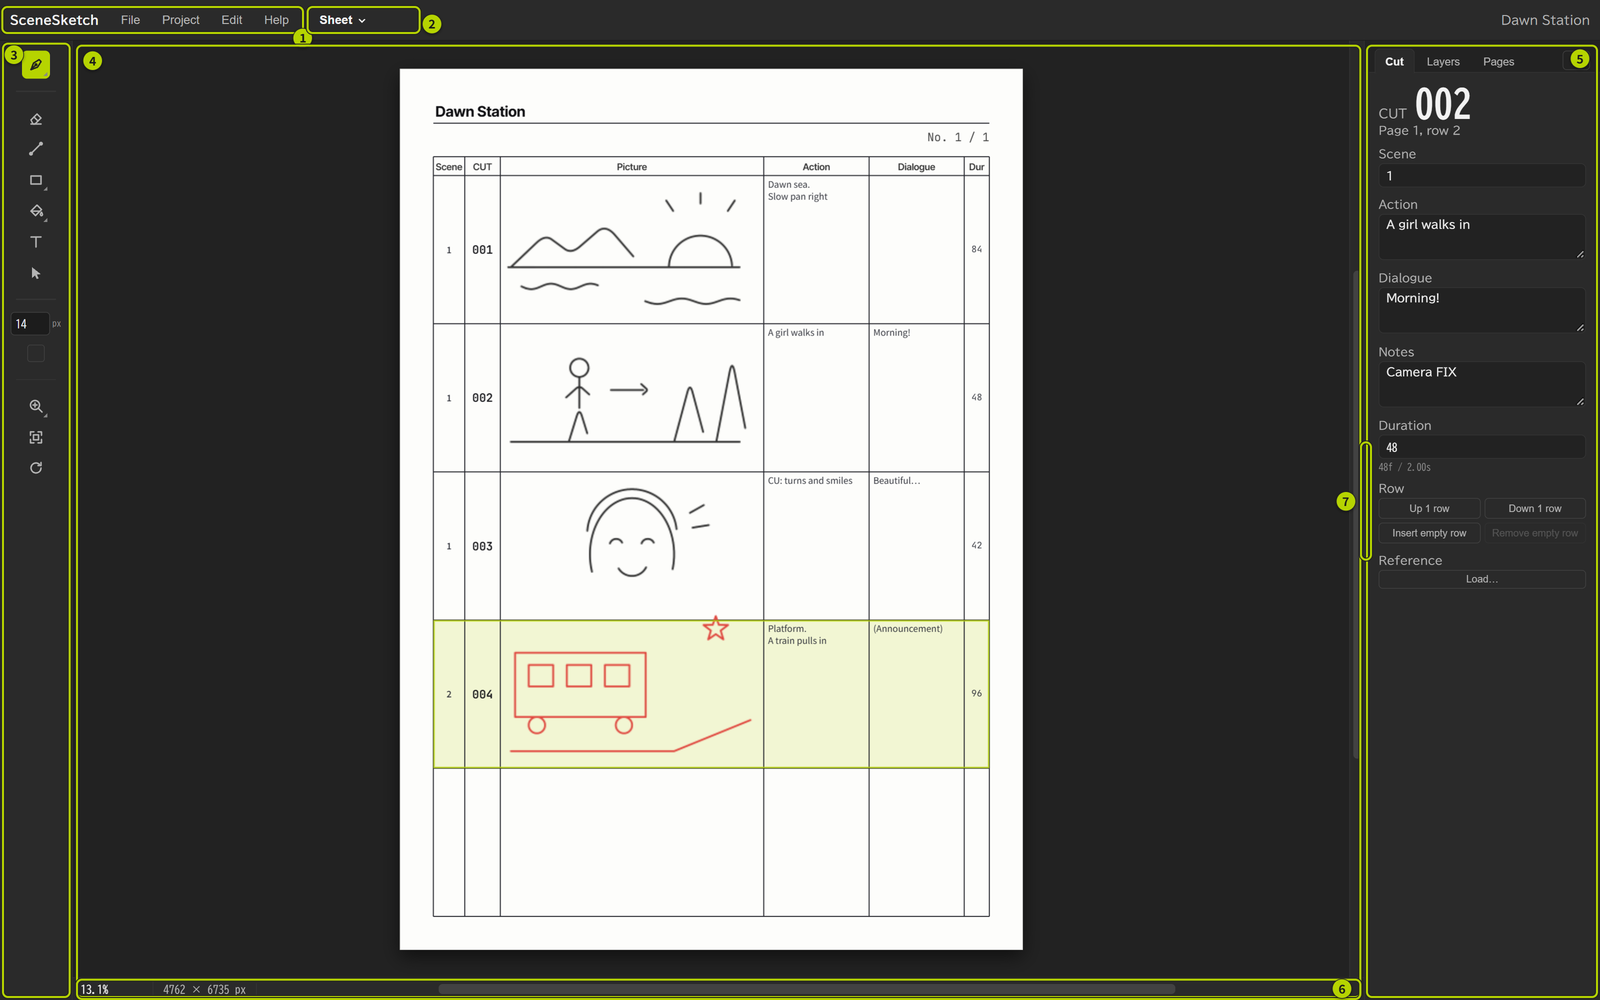
| No. | Name | What it does |
|---|---|---|
| ① | Menu | File, Project, Edit and Help. The project name is at the right end (a dot appears next to it when you have unsaved changes) |
| ② | View switcher | Switches between Sheet / Shot List / Timeline (Shift+1 / 2 / 3) |
| ③ | Tools | Brush, eraser, shapes and other tools (4-1) |
| ④ | Sheet | The storyboard sheet. You draw and write here. There are scroll bars on the right and bottom |
| ⑤ | Right panel | The "Cut", "Layers" and "Pages" tabs (4-10) |
| ⑥ | Zoom and sheet size | The current zoom (%) and the sheet size (px) (4-4) |
| ⑦ | Right panel edge | Drag left or right to change the width of the right panel (double-click to reset the width) |
Screen colors
- Lime green — Selected items, clickable items, waveforms
- Orange — Warnings, deleting, markers, the "Handwritten" mark, audio meter clipping
What the 3 views are for:
| View | What it's for |
|---|---|
| Sheet | Drawing and writing on the storyboard sheet |
| Shot List | A table of your cuts. Entering text and reordering |
| Timeline | Setting durations to match the audio. Playing the animatic |
Setting durations by eye and playing them back is done on the Timeline. On the sheet, you enter numbers in the duration column and in the right panel.
4Drawing on the sheet
4-1. Tools
The column on the left side of the screen holds the tools. For buttons with a small triangle at the bottom right, right-click (or press and hold) to choose a type.
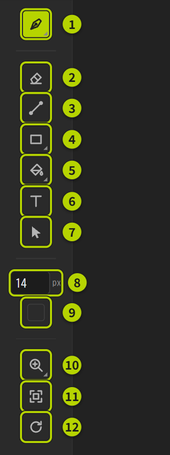
| No. | Tool | Key | How to use |
|---|---|---|---|
| 1 | Brush | B | Drag to draw. Right-click to choose Pencil / Pen / Marker / G-Pen |
| 2 | Eraser | E | Drag to erase |
| 3 | Line | U | Drag to draw a straight line. Hold Shift for 45° steps |
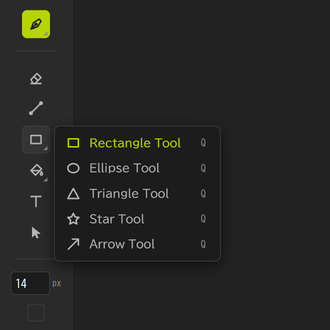
| 4 | Shape | Q | Rectangle / Ellipse / Triangle / Star / Arrow. Each press of Q switches to the next one (4-3) |
| 5 | Fill | G | Fills only inside the area you click. Right-click to set the strength (Low / Medium / High) |
| 6 | Text | T | Places text where you click (Enter to confirm) |
| 7 | Select | V | Grab a row and move it (4-9) |
| 8 | Size | [ ] | Enter the size in px. You can also drag left or right to change it. Keys 1–5 set preset sizes. The size is remembered for each brush type |
| 9 | Color | Click the current color swatch to choose a color. Use the eyedropper to pick a color from the sheet | |
| 10 | Zoom Tool | Z | Click to zoom in, Alt+click to zoom out. Right-click to switch to zoom out |
| 11 | Fit to Window | Ctrl+0 | Resets the zoom so you can see the whole sheet |
| 12 | Rotate View | R | Drag the sheet to rotate it (Shift for 15° steps). Click the angle shown below to reset it. Only the view rotates, not your drawings |
4-2. Brush types
Right-click the brush button to choose a type.
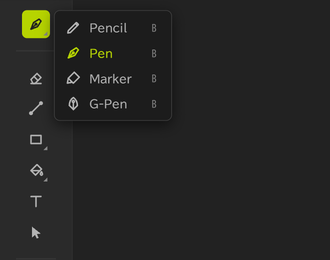
The brush button's icon changes to the type you chose. Press B to go back to the brush.
4-3. Shapes
Right-click the shape button to choose a shape.
While a shape is selected, a bar appears above the sheet.
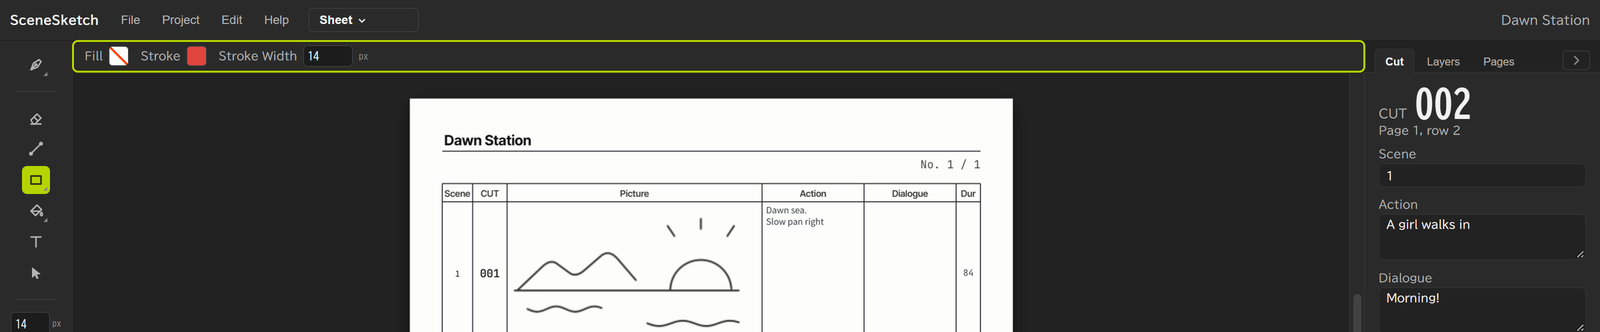
- Click the Fill / Stroke swatch to choose a color. Alt+click to switch between "None" and a color
- Enter the Stroke Width in px. Like the brush size, you can also drag left or right to change it
- While dragging, hold Shift for a square or circle, or Ctrl to draw from the point where you started as the center
- Shape fill and stroke colors are remembered separately from the brush color
4-4. View controls
- Use the mouse wheel to zoom in and out, and drag with the wheel button held down to move around
- Ctrl+= / Ctrl+- zoom in and out, and Ctrl+0 fits the whole sheet in view
- There are scroll bars on the right and bottom of the sheet. Drag the thumb to move to the area you want to see
- Zoom (%) at the bottom left — Click it and type a number, or drag left or right to change it (hold Shift for steps of 10). The sheet size (px) is shown on the right
- When you fit the whole sheet in view, it's sized so the scroll bars don't cover the sheet
4-5. Fields (Scene / Action / Dialogue / Duration)
You can type in the fields on the right side of each row, or write in them by hand. The sheet columns are Scene / CUT / Picture / Action / Dialogue / Dur.
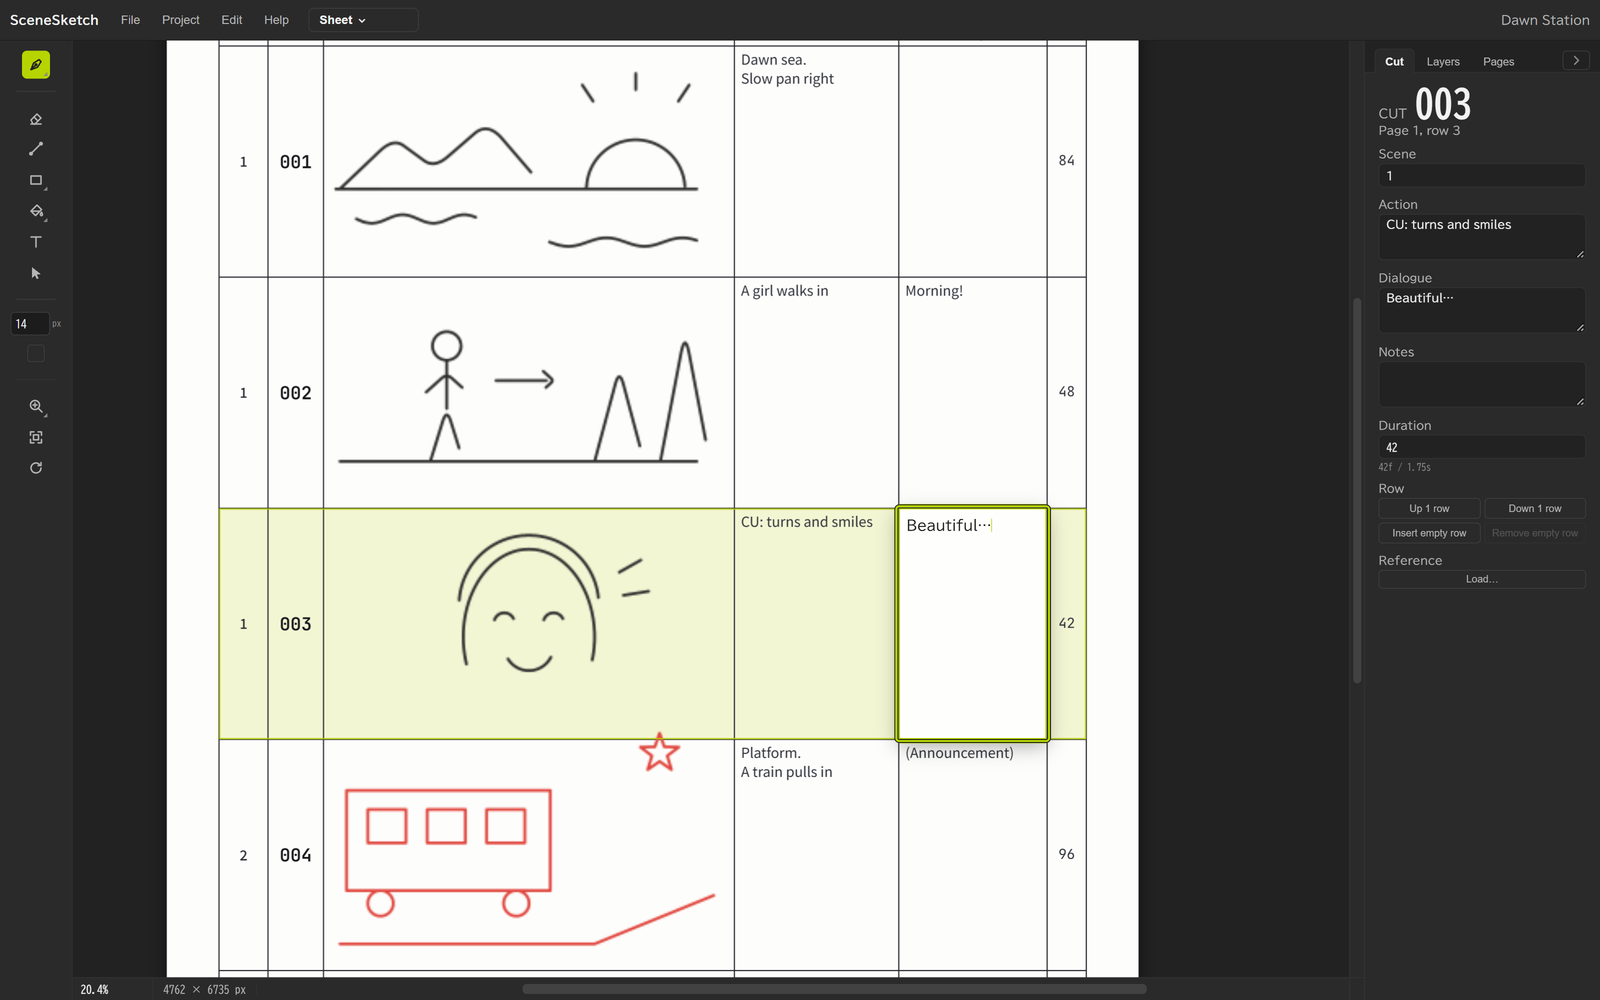
- Short click → You can type. Enter to confirm, Shift+Enter for a new line, Esc to cancel
- Drag → Writes by hand right away
- Notes has no column on the sheet. Enter notes in "Notes" in the right panel, or in the Shot List
Only typed text flows into the Shot List, the PDF text and After Effects. For fields that only have handwriting, the right panel shows the "✎ Handwritten" mark (orange).
4-6. Entering and displaying durations
At first, durations are shown as a frame count (for example, 84).
Each time you Ctrl+click a duration field (the Dur column on the sheet, Duration in the right panel, or DURATION in the Shot List), the display switches frames → timecode → sec+frames. The format you choose is used in the other views too.

When you enter a duration, any format is accepted (examples at 24 fps).
| What you type | Meaning |
|---|---|
3+12 | 3 seconds 12 frames (= 84 frames) |
00:00:03:12 | Timecode (= 84 frames) |
72f | 72 frames |
2.5 | 2.5 seconds |
84 (a plain number) | 84 frames when the display is frames or timecode, 84 seconds when it's sec+frames |
4-7. Cut numbers
A row with a drawing or text becomes a "cut" and gets a number (001, 002 …) in order from the top. Empty rows don't get a number.
4-8. Pages
The list of pages is in the "Pages" tab of the right panel.
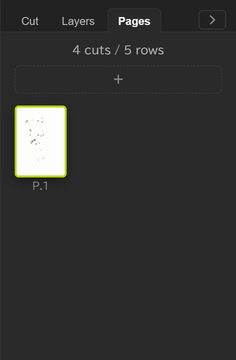
- The number of cuts and rows is shown at the top
- Click "+" to add a page (5 rows per page)
- Click a page thumbnail to switch to that page
- Hover over a page to show its delete button
4-9. Moving rows
With the Select tool (V), grab a row and drag it.
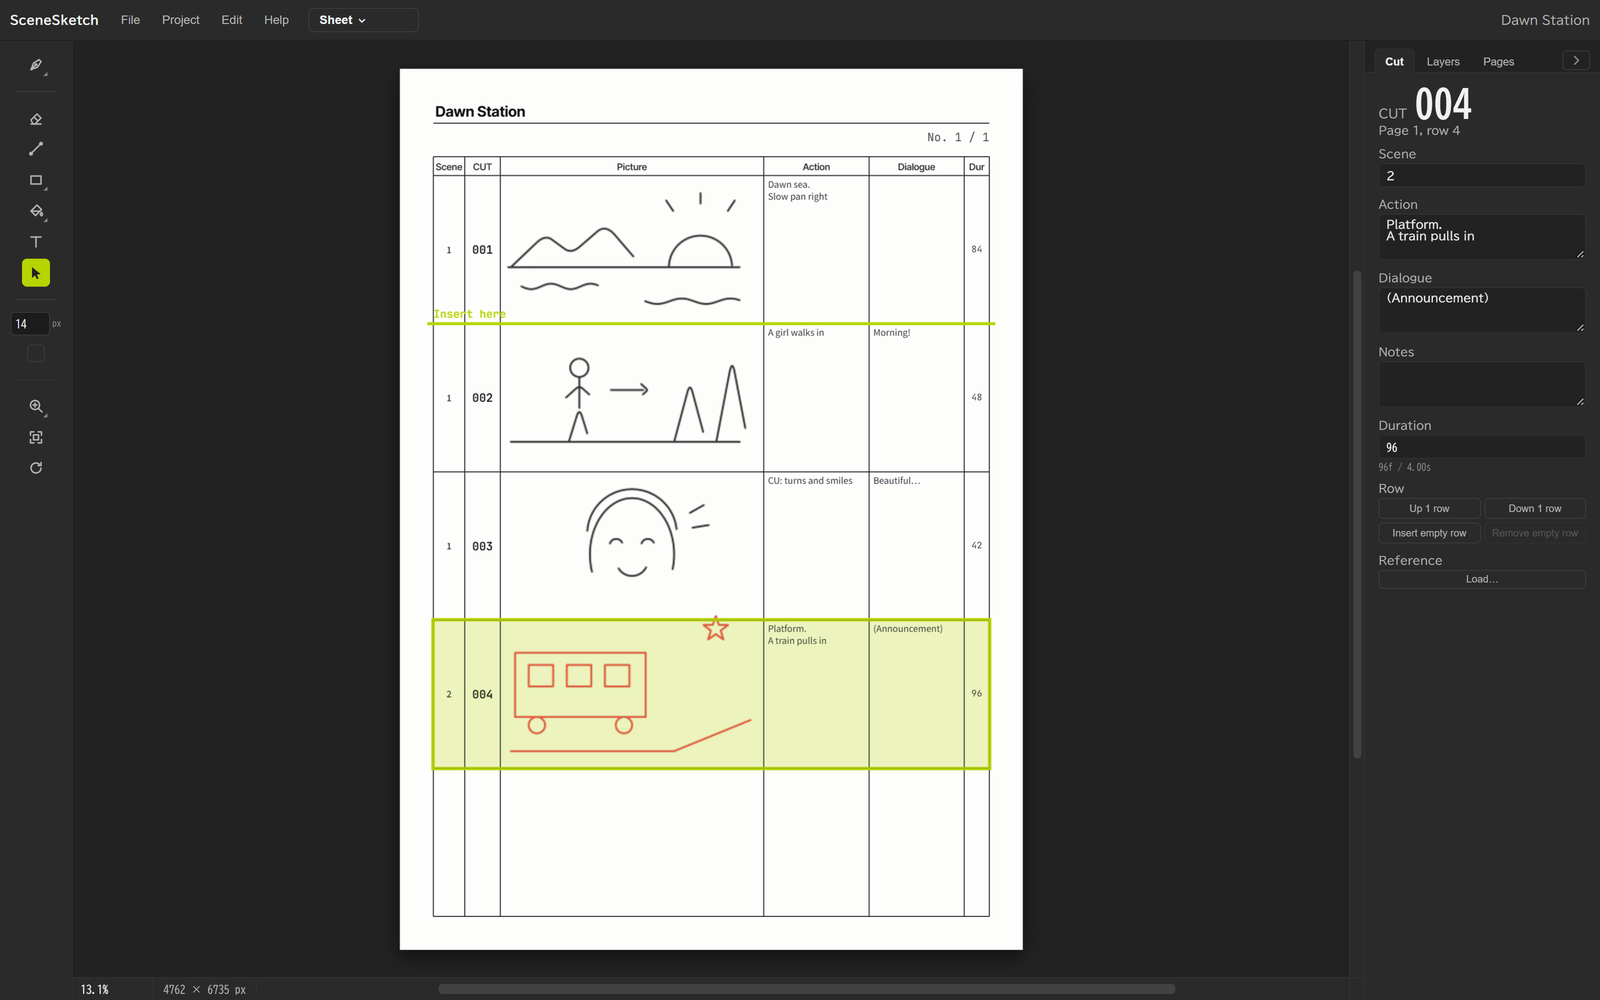
- Drag → The row is inserted at the lime line (the insert position). The rows in between shift by one
- Alt+drag → Swaps the two rows
- The drawing, the fields and the cut info all move together
- To move rows across pages, use the "Row" buttons in the right panel, or the Shot List
4-10. Right panel
The right panel has 3 tabs: "Cut", "Layers" and "Pages". Click a tab at the top to switch. The tab you chose is remembered for next time.
- Use the arrow at the top right to close / open the panel
- Drag the left edge of the panel left or right to change its width. Double-click it to reset the width
"Cut" tab — Info for the row (cut) selected on the sheet.
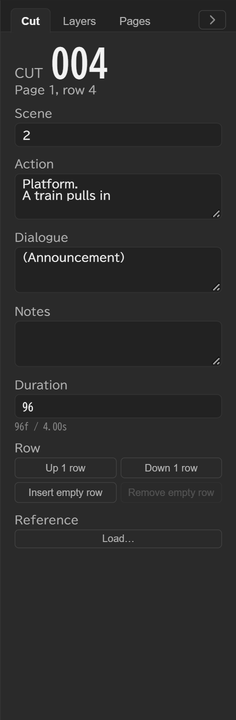
- The cut number, and which page and row it's on
- Scene / Action / Dialogue / Notes / Duration — The same content as the fields on the sheet. Typing here does the same thing. Below the duration, the frame count and seconds are shown in small text
- Row — Up 1 row / Down 1 row / Insert empty row / Remove empty row
- Reference — Places an image under the Picture frame (Load… / Replace / Remove). You can choose how strong it is. You can also drag and drop an image onto a row on the sheet
- When no row is selected, you'll see "Click a row on the sheet to see its cut fields"
"Layers" tab — The layers of the current page.
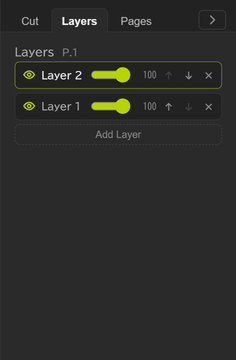
- Click "Add Layer" to add one. Use the eye icon to show / hide, the slider for opacity, the arrows to reorder, and × to delete
- You draw on the layer you click (the layer with the lime frame is the one you're drawing on)
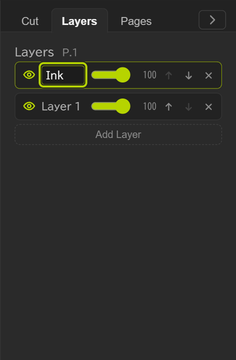
- Double-click a layer name to rename it. Enter to confirm, Esc to cancel
"Pages" tab — The list of pages (4-8).
4-11. Undo
- Ctrl+Z — Undo
- Ctrl+Shift+Z or Ctrl+Y — Redo
You can undo drawing, writing, moving rows, adding / deleting pages, changing durations, layer operations and project settings.
5Shot List
This view shows your cuts as a table, so you can enter text in bulk and reorder them (Shift+2).
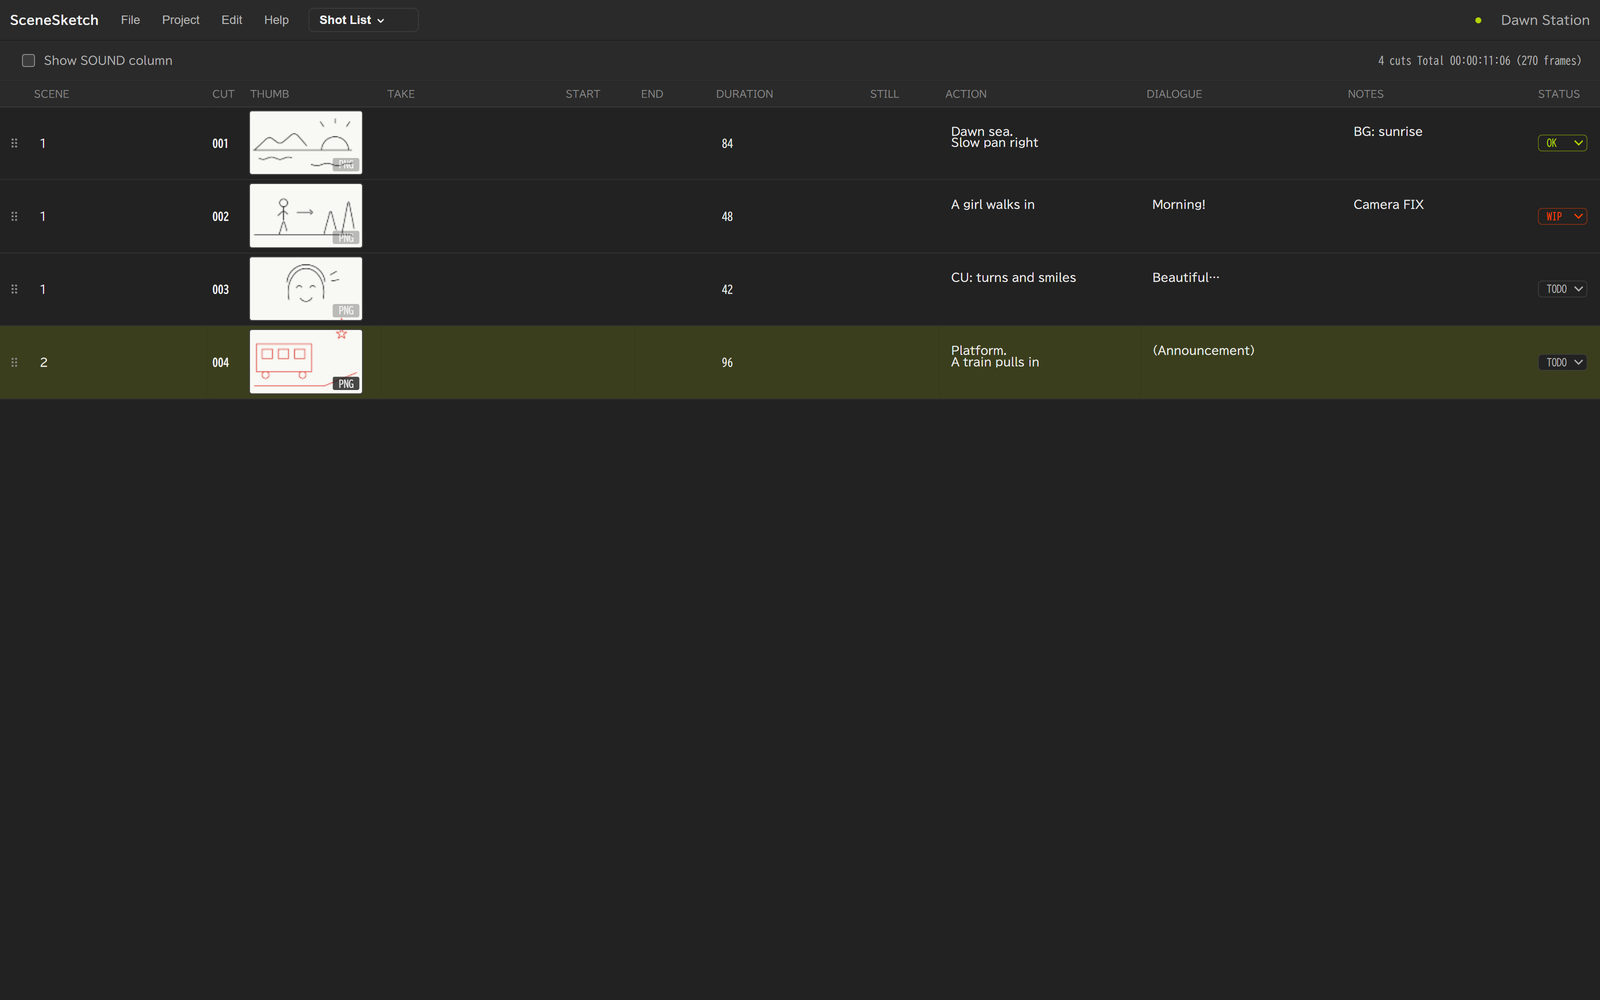
- Columns: SCENE / CUT / THUMB / TAKE / START / END / DURATION / STILL / ACTION / DIALOGUE / (SOUND) / NOTES / STATUS
- Click a cell to type in it. When you enter START and END, the duration is calculated automatically
- As on the sheet, Ctrl+click switches the duration display (4-6)
- STATUS — Choose TODO / WIP / OK. The line above each cut clip on the Timeline takes the status color (TODO gray, WIP orange, OK lime)
- Drag the left end of a row (⠿) to reorder. The row moves together with its drawing
- Double-click a thumbnail → Jumps to that cut on the sheet
- PNG at the bottom right of a thumbnail → Saves that cut as a PNG (full size)
- Use "Show SOUND column" at the top left to show or hide the SOUND column
- The number of cuts and the total duration are shown at the top right
6Timeline
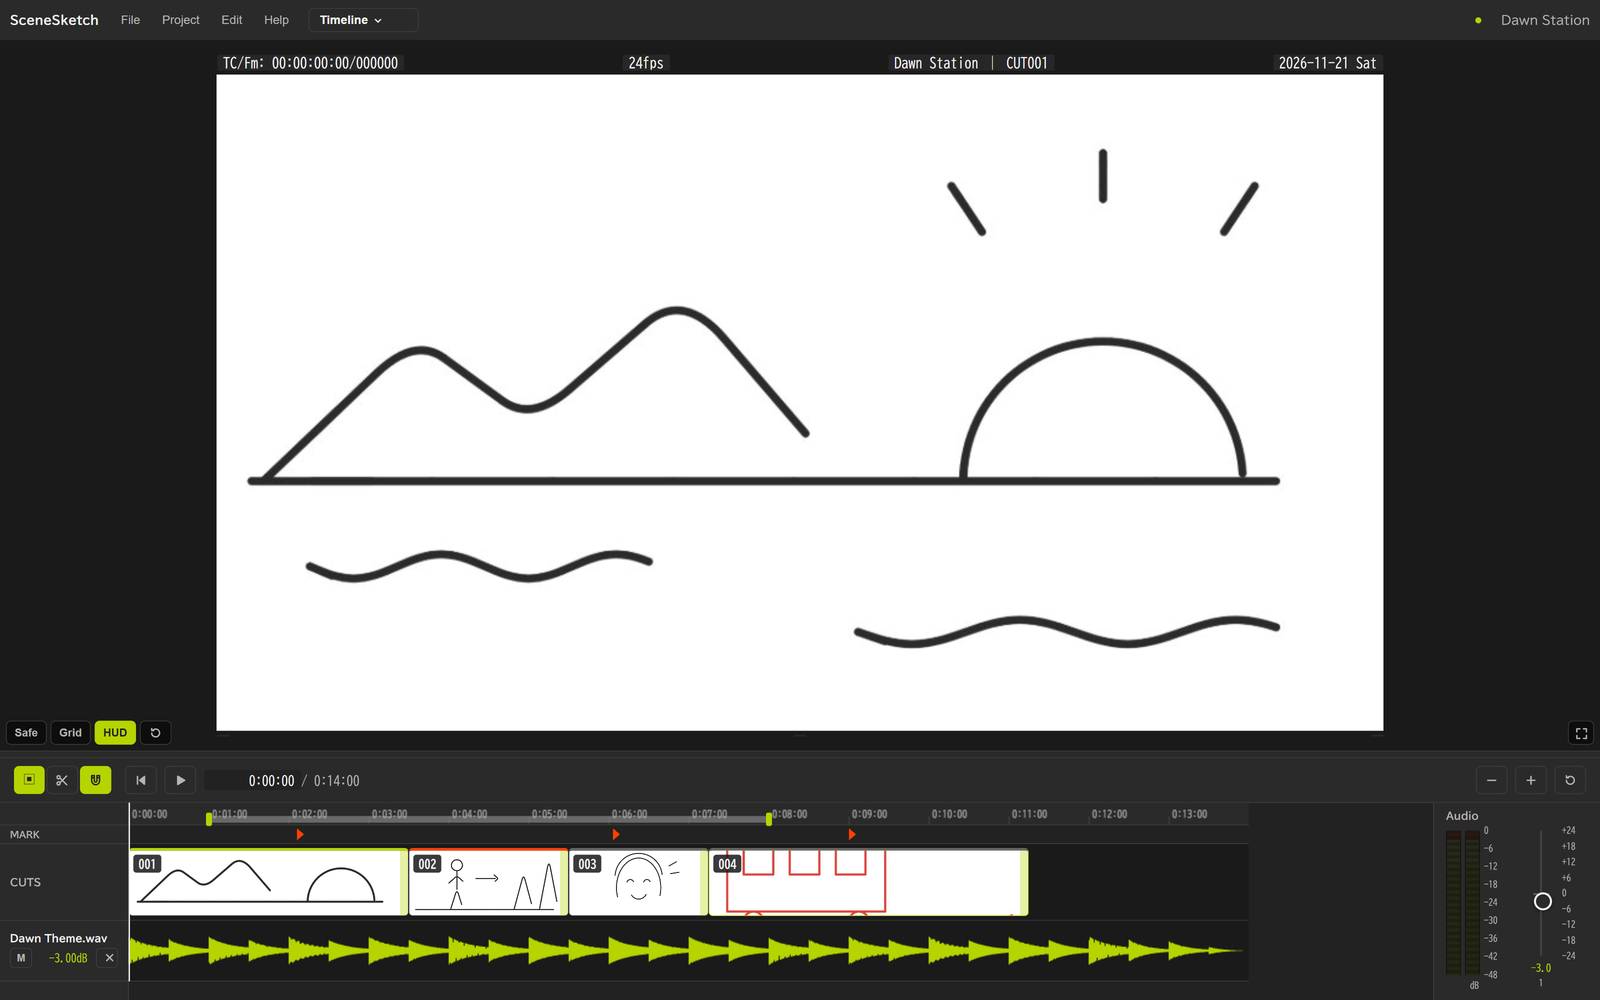
This view is for setting durations to match the audio and playing them back as an animatic (Shift+3).
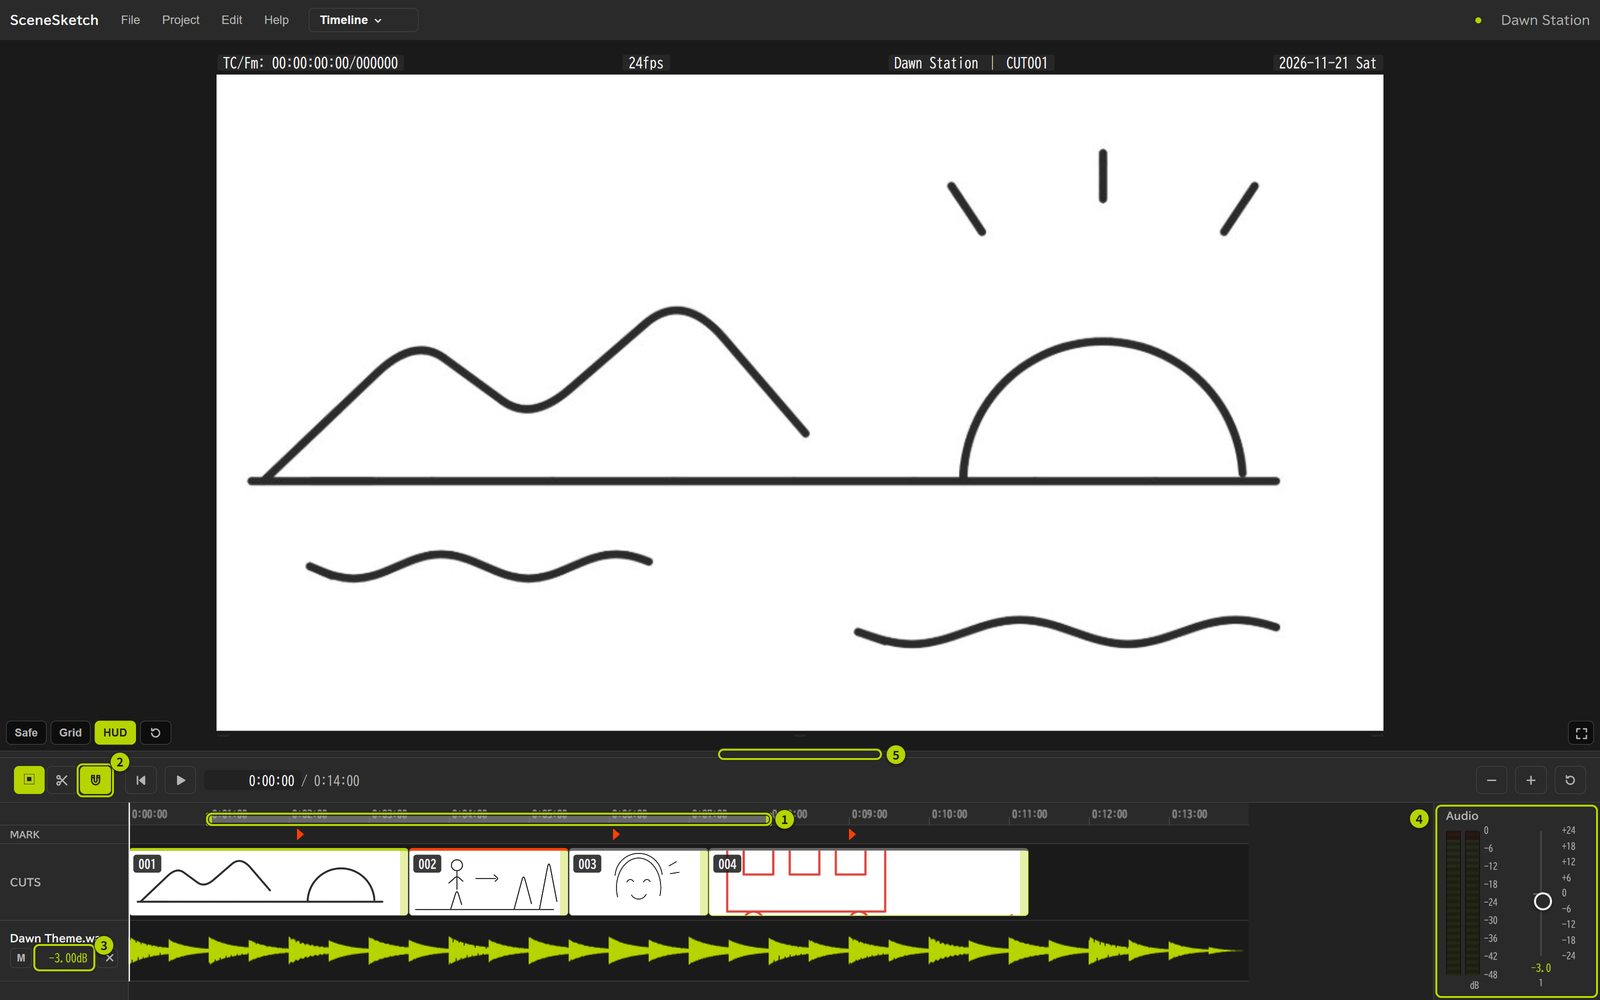
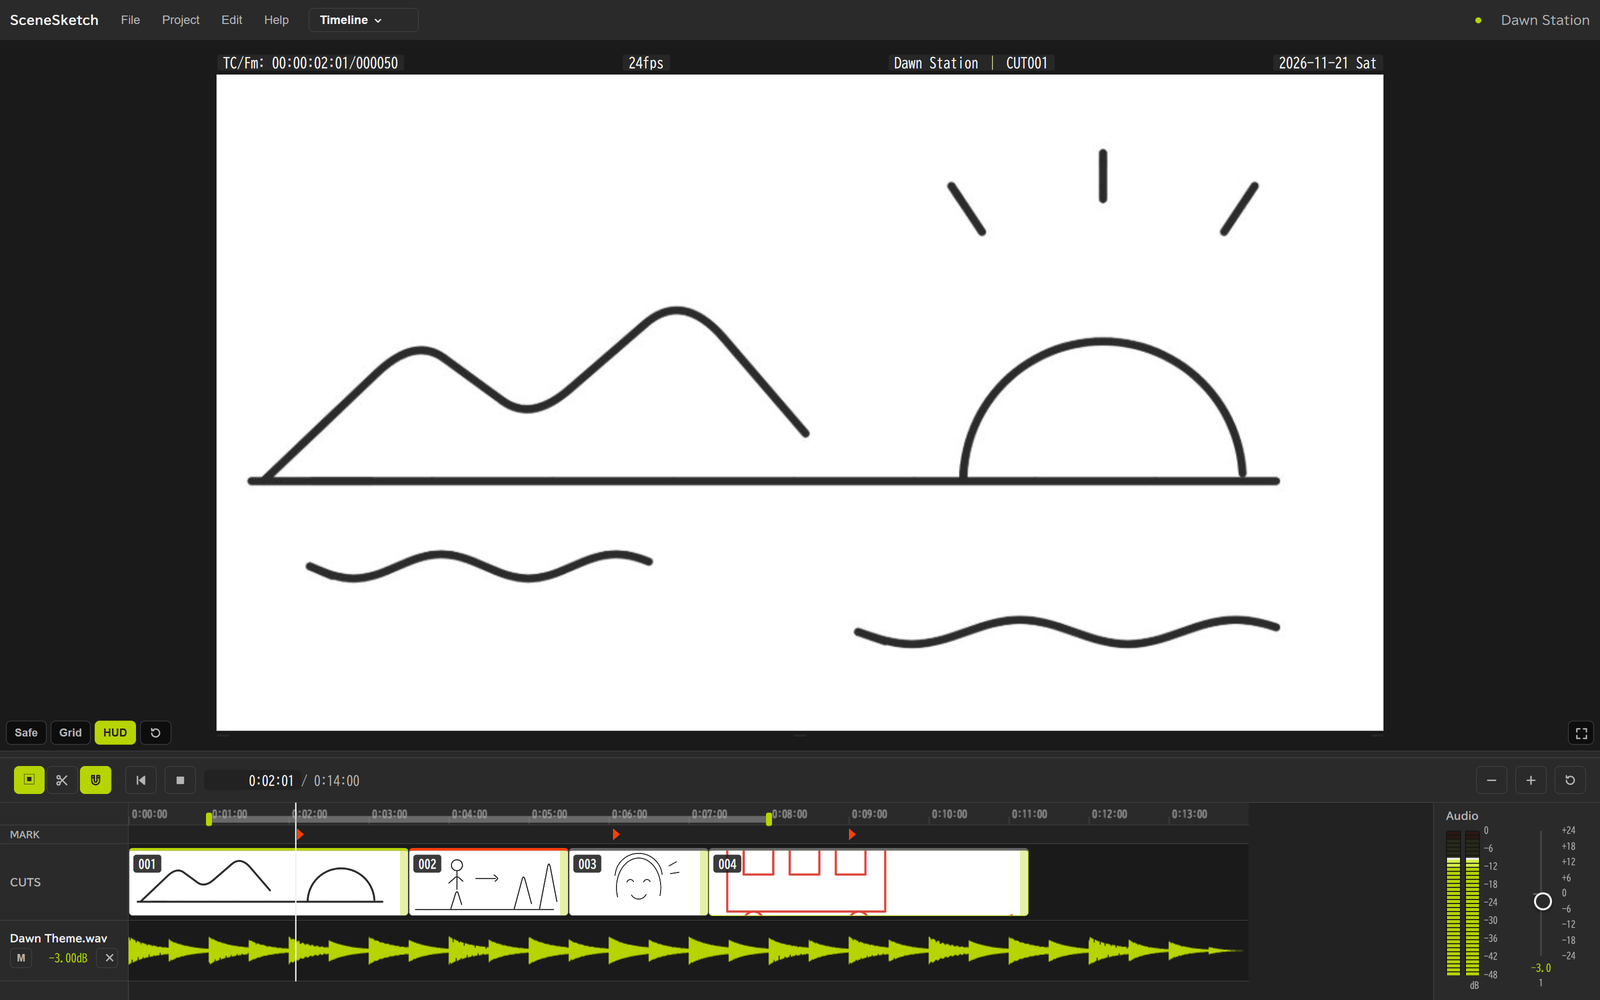
| No. | Name | What it does |
|---|---|---|
| ① | Source In / Out | The range to export (6-6) |
| ② | Snapping (magnet) | Snaps the playhead to cut edges and markers (6-5) |
| ③ | Volume | The volume (dB) of each audio track (6-3) |
| ④ | Audio meter | The loudness during playback, and a fader for each audio track (6-3) |
| ⑤ | Monitor border | Drag up or down to resize the monitor (double-click to reset the size) |
6-1. Basic workflow
- Load your audio (6-2)
- Drag the ends of the cut clips to match the durations
- Press Space to play. The animatic appears in the monitor at the top
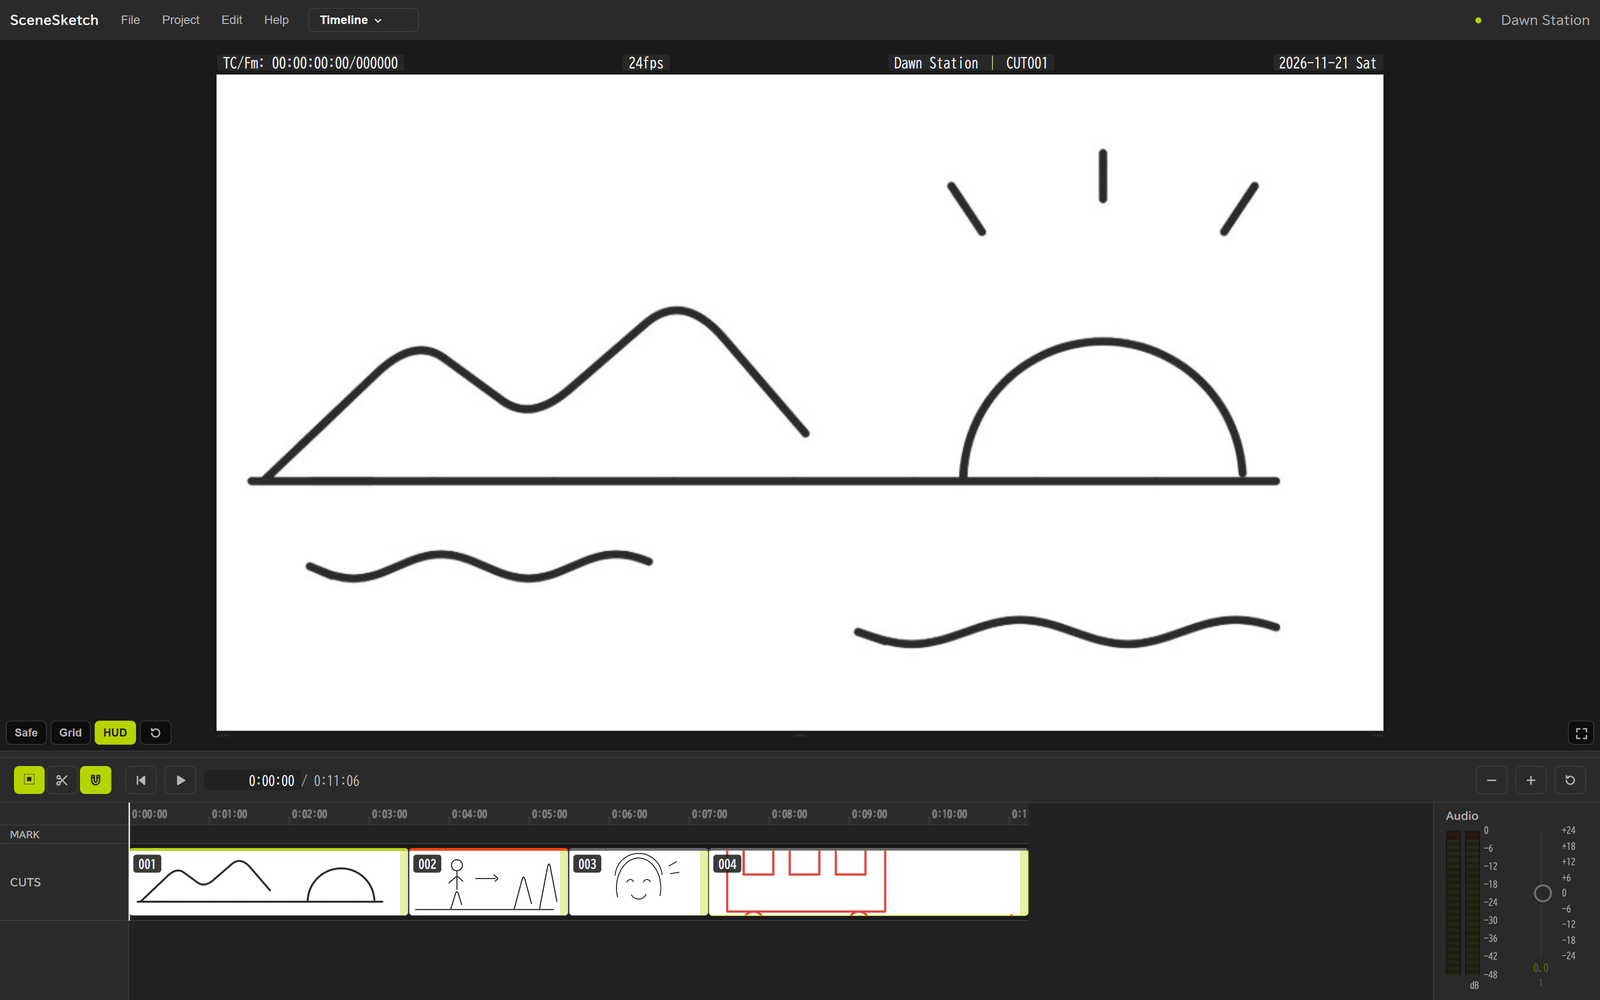
At first, the monitor takes up about 70% of the screen. Drag the border between the monitor and the timeline up or down to resize it. Double-click it to reset the size.
Markers appear as orange triangles. The line above each cut clip shows the cut's status color (5.).
Monitor buttons (bottom left)
- Safe — Shows the safe areas (action 90% / title 80%)
- Grid — Shows rule-of-thirds lines
- HUD — Shows the timecode, fps, project name, cut and date, aligned to the width of the picture
- Circular arrow — Resets the zoom and position
- Button at the bottom right — Shows the monitor full screen (Esc to go back)
6-2. Loading audio
- Choose File > Import > Audio… (as many files as you like)
- Or just drop audio files onto the timeline to load them
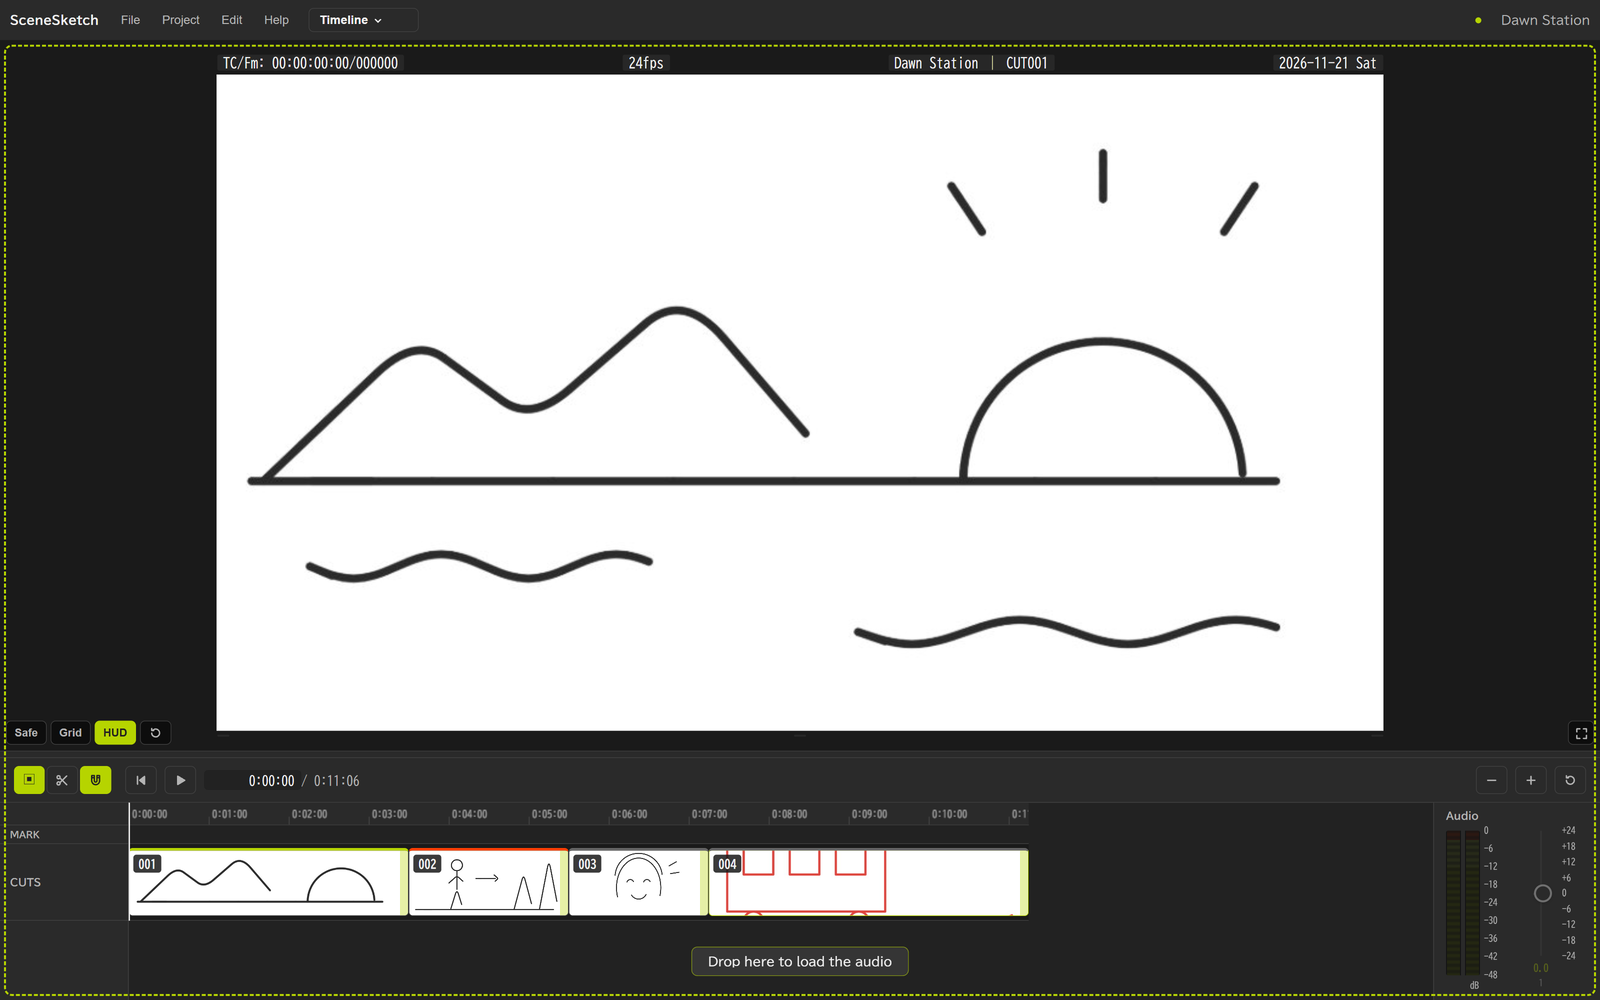
- Under the audio track name, click M to mute or × to remove the track
6-3. Volume
Change the volume of each audio track with the number under the track name (+0.00dB).
- Drag left or right to change it (hold Shift for 1 dB steps). You can also click it and type a number
- The range is -24 to +24 dB
- The volume you set is used for playback, MP4 export and sending to After Effects (only one audio track is sent to After Effects: the top-most one that isn't muted)
The audio meter on the right shows the loudness during playback (left and right, 0 to -48 dB) in LED-like segments. Where the sound is too loud and clips, the top segments turn orange. To the right of the meter, there's a vertical fader for each audio track.
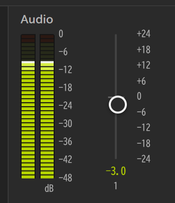
- Drag a fader up or down to change the volume (it's the same value as the number under the track name)
- Double-click a fader to reset it to 0 dB
- Even when there's no audio yet, the meter looks the same. The faders are dimmed and can't be moved
6-4. Splitting cuts
When you choose the Blade / Cut Tool (C), an orange line follows the mouse. Click to split the cut there.
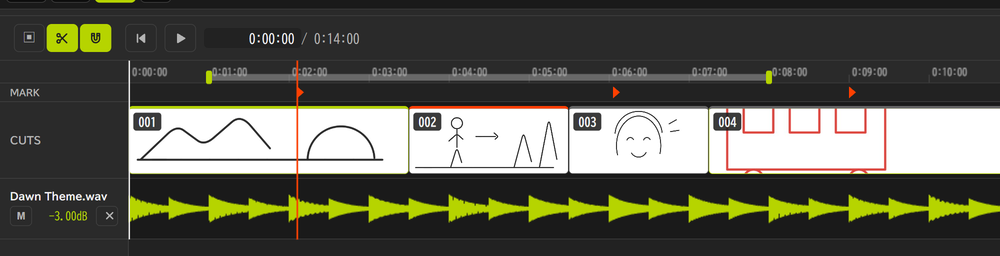
Switch back to the Select Tool (V) to return to normal editing.
6-5. Snapping (magnet)
The magnet button in the button row at the top is on at first.
- When it's on, hold Shift while moving the playhead to snap to cut edges and markers
- Click it again to turn it off
6-6. Source In / Out
This sets the range to export.
- B — Sets Source In at the playhead
- N — Sets Source Out at the playhead
- Ctrl+Shift+X — Clears Source In / Out
- The range appears as a band above the time ruler. Drag the ends of the band to move them. Double-click the band to clear it
- Under "Range" in the export dialog, you can export just the part between Source In / Out (9-1)
6-7. Keys
| Key | Action |
|---|---|
| Space | Play / Stop |
| M | Add a marker at the playhead (right-click for a memo) |
| V / C | Select Tool / Blade / Cut Tool |
| B / N | Source In / Source Out (at the playhead) |
| Ctrl+Shift+X | Clear Source In / Out |
| ← → | Move 1 frame (Shift for 5 frames) |
| Home / End | Go to start / end |
| D | Go to the start of the selected cut |
| = / - / \\ | Zoom in / zoom out / reset horizontally (Ctrl+wheel also works) |
- Double-click a clip to jump to that cut on the sheet
6-8. Generating cuts from markers
Place markers where the music changes, then choose Project > Generate Cuts from Markers.
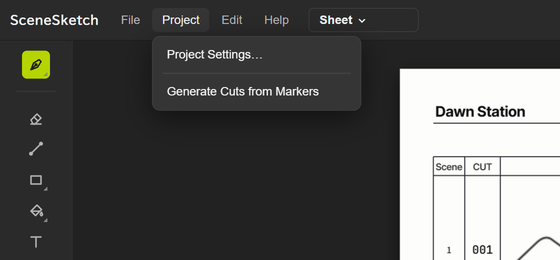
- Each span between two markers becomes 1 cut, with START / END filled in
- If you run it again, existing cuts keep their drawings and notes; only their durations change
- Cuts in spans whose markers you removed aren't deleted. They stay as manual cuts
7Project settings
Open it from Project > Project Settings….
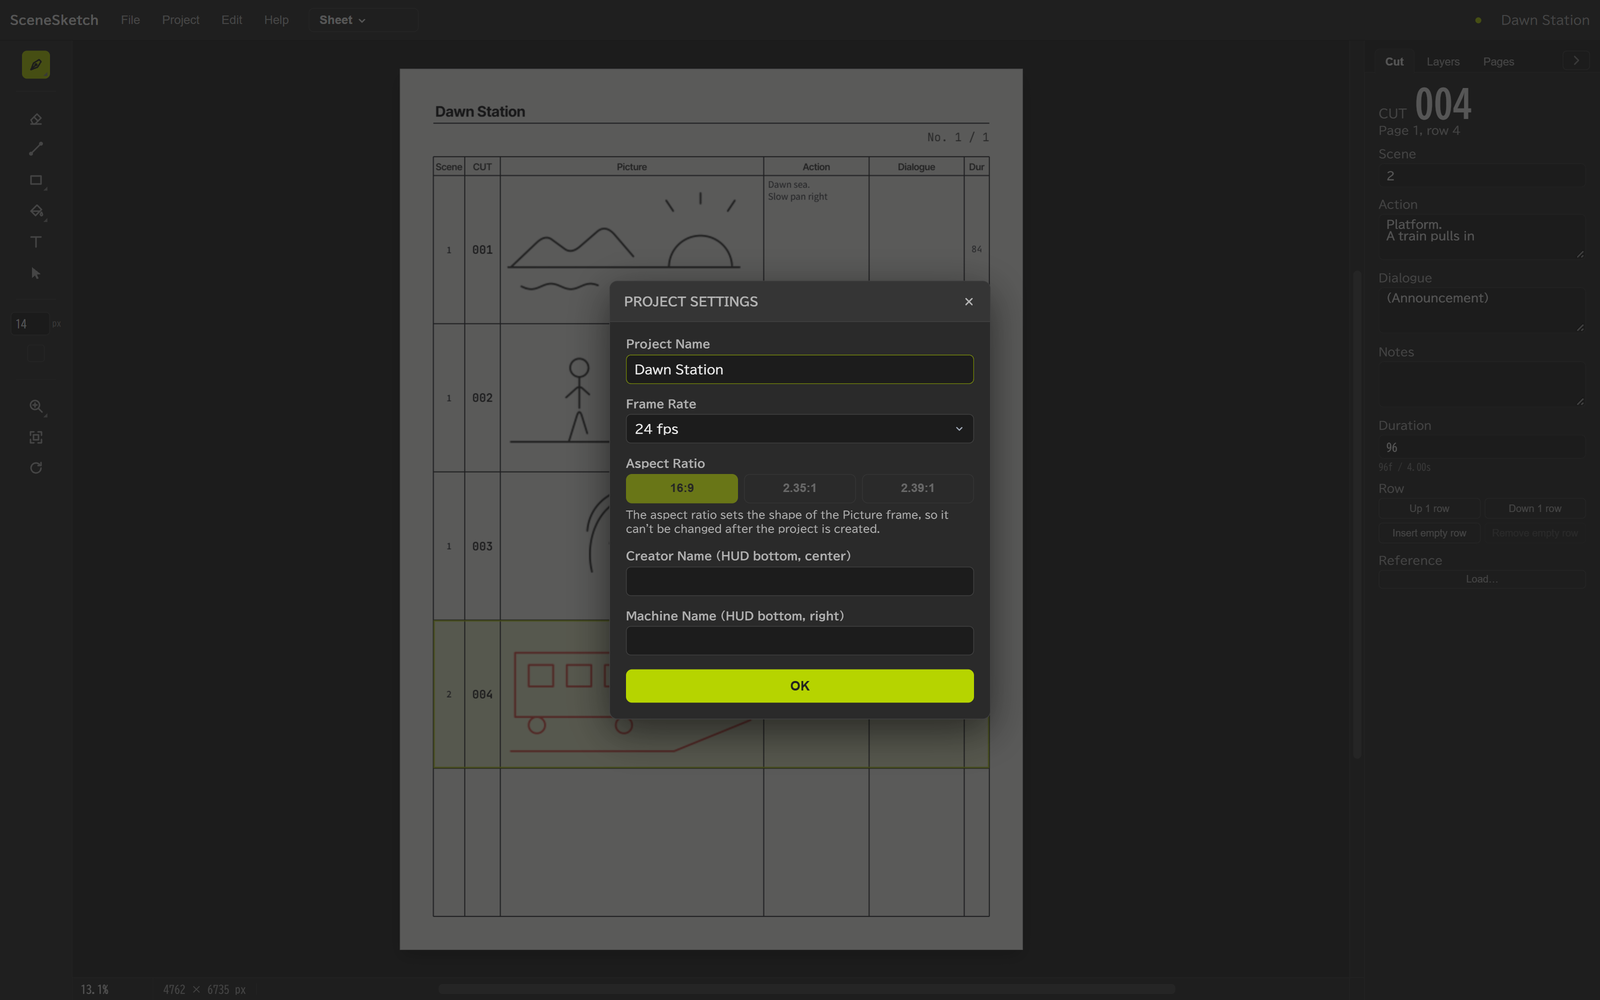
- Project Name — Used for the title at the top of the sheet, export file names and more
- Frame Rate — Choose from the drop-down (23.976 / 24 / 25 / 29.97 / 30 / 50 / 59.94 / 60 fps). For a value not in the list, choose "Custom…" and type the number
- Aspect Ratio — Can't be changed after the project is created (display only)
- Creator Name — Shown at the bottom center of the animatic HUD
- Machine Name — Shown at the bottom right of the animatic HUD
If you change the fps partway through: durations entered in seconds stay the same, while durations entered in frames (START / END) change in seconds.
8Saving
8-1. How to save
- Press Ctrl+S (File > Save) to save
- When you have unsaved changes, a dot appears next to the project name at the top right. If you press Ctrl+Z back to the state you saved, the dot goes away
- If you close or open another project while you have unsaved changes, you're asked to confirm
- Use File > Save As… to save under a different name or location
- Use File > Show Project Folder in Explorer to open the folder where the project is saved
- Press Ctrl+W (File > Close Project) to close the project and go back to the start screen
8-2. Inside the project folder
A project is saved as a single folder. You can move, copy or back up the whole folder. To open it, choose the .sske file inside.
Dawn Station/                … project folder
  Dawn Station.sske          … project file (open this one)
  Dawn Station.sske.prev     … the project file from the previous save (backup)
  Pages/                     … drawings for each page (PNG)
  Refs/                      … reference images
  Audio/                     … imported audio (kept as the original files)
  Exports/                   … where MP4, PDF and PNG exports go
  AfterEffects/              … files handed to After Effects
  Auto Saves/                … autosaves (Dawn Station-01.bak …)
Logs/ … export logs- When saving, each file is first written under a different name and then swapped in. Even if the app crashes partway, your previous save isn't damaged
- If the project file can't be read, you're asked whether to open the previous save (
.sske.prev) instead - If any drawing files can't be read, you're told when opening (those drawings open empty, and the original files are not deleted)
8-2-1. Where imported audio and reference images go
In a project that has been saved, audio and reference images are placed in the project folder's Audio (audio) and Refs (reference images) folders as soon as you import them, with their original file names.
- If a file with the same name is already there, something like " (2)" is added to the end of the name (for example,
demo_song (2).wav) - When you hand the project folder to someone or use it in other software, it's easy to tell which file is which
- In a project that hasn't been saved yet, they're placed there the first time you save
- In projects made with SceneSketch 0.4.3 or earlier, audio and reference images have internal numbered names. They're renamed to the original file names the next time you save
8-3. Sharing and backing up (packaging)
Use File > Package Project… to bundle the project into a single zip.
- Included: the project file, drawings, reference images, audio
- Not included: exports, autosaves, logs
8-4. Auto save
When there are changes, the project is saved at a set interval to the Auto Saves folder, in order starting from name-01.bak. Once the set number is reached, the oldest file is overwritten first.
- You can change the interval (1–60 min, default 15 min) and the number of files to keep (default 10) in Edit > Preferences…
- Hover over the project name at the top right to see when the last autosave happened
- If an autosave fails, "Auto save is not working" appears at the top right. Press Ctrl+S to save
- If there's an autosave newer than your last save, you're asked whether to open the autosave when you open the project
- You can open a
.bakfile directly with File > Open…. After opening it, the project is "unsaved", so press Ctrl+S to save - Even if the app crashes, you're asked whether to restore from the autosave the next time you start it (or open the project)
8-5. Projects from earlier versions
When you open a project saved with SceneSketch 0.3.3 or earlier, you're asked: "It was made with an earlier version of SceneSketch. Convert it to the current format and open it?"
- Click "OK" to convert it to the current format and open it as an unsaved project. The original file stays as it is
- Press Ctrl+S and choose where to save it (if you choose the same location, it's overwritten after you confirm)
- Projects saved in the current format can't be opened in SceneSketch 0.3.3 or earlier
9Exporting
Choose from File > Export.
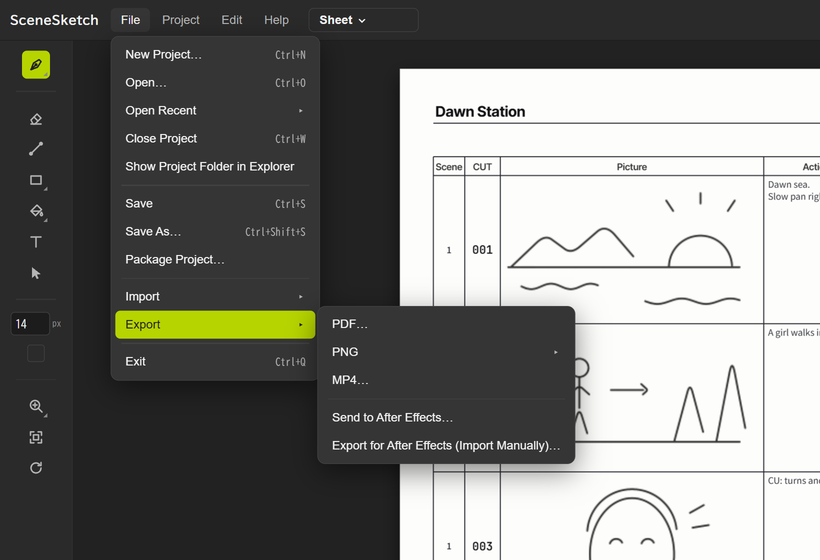
| Menu | What you get |
|---|---|
| PDF… | The storyboard sheet as a PDF, as it is. Typed text can be selected and searched, and URLs are clickable |
| PNG > Selected Cut… | The Picture of the selected cut, at full size |
| PNG > All Cuts… | All cuts, numbered in sequence as CUT001.png … |
| MP4… | The animatic (MP4, or a PNG sequence) |
| Send to After Effects… | Sends to After Effects and imports there (10.) |
| Export for After Effects (Import Manually)… | Only exports the files for After Effects (doesn't start After Effects) |
MP4, PDF and PNG files are exported to the project's Exports folder by default.
9-1. Exporting an MP4 (animatic)
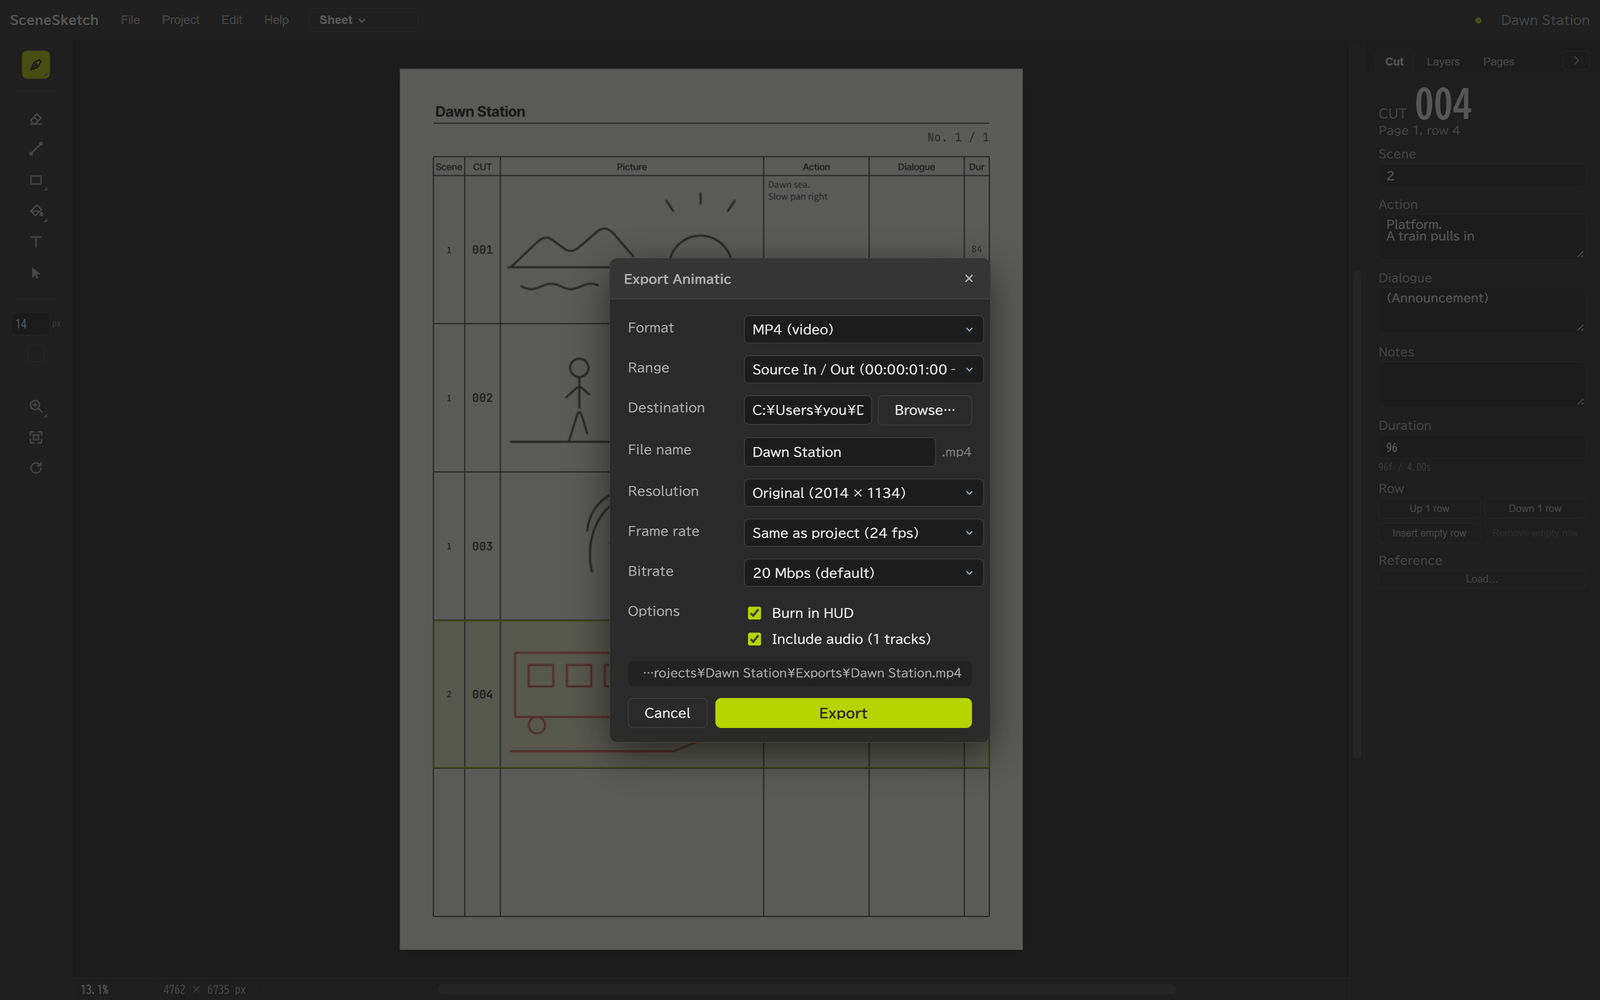
| Item | Details |
|---|---|
| Format | MP4 (video), or PNG sequence |
| Range | Entire Source, or Source In / Out (only the range set with B / N on the timeline. 6-6) |
| Destination | You can change it with "Browse…" |
| File name | The extension (.mp4) is added automatically |
| Resolution | Original, or a width of 1280 / 1920 / 3840 px. With "Custom width…" you can also type a width from 320 to 7680 |
| Frame rate | Same as the project, or a different value |
| Bitrate | 20 Mbps (default) and others |
| Options | Burn in HUD (timecode, fps, project name, cut number, date, creator name, machine name) / Include audio (at the volume set on the timeline) |
The location of the file to be exported is shown at the very bottom. Click "Export" to start. MP4s are made inside the app, so long durations take a while.
9-2. While exporting
When the export starts, a progress panel appears.
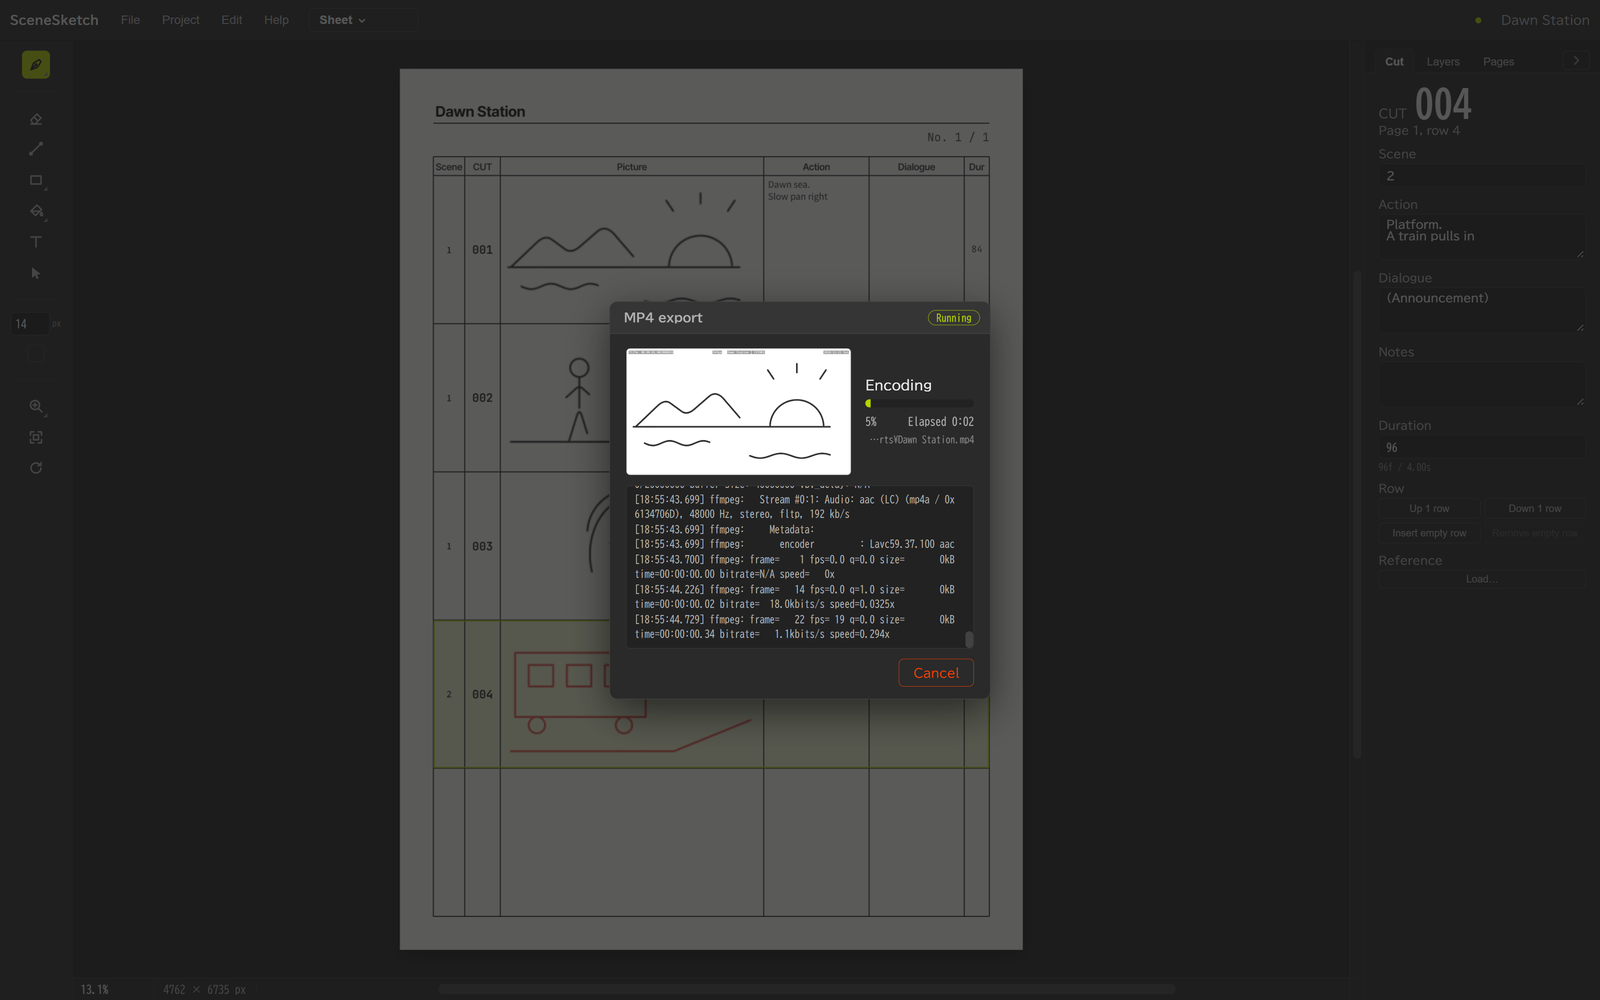
- The current stage, progress (%) and elapsed time. For MP4 the stages are "Preparing → Loading video encoder → Rendering frames → Mixing audio (only when audio is included) → Encoding → Saving file". For a PNG sequence they are "Rendering frames → Saving file", and when sending to After Effects, "Exporting cut pictures → Saving file → Launching After Effects"
- A preview of the image being exported
- The log (the steps being processed; for MP4, the encoder output also scrolls by)
- Cancel — Stops partway. You can export again even after canceling
When it's done, it looks like this.
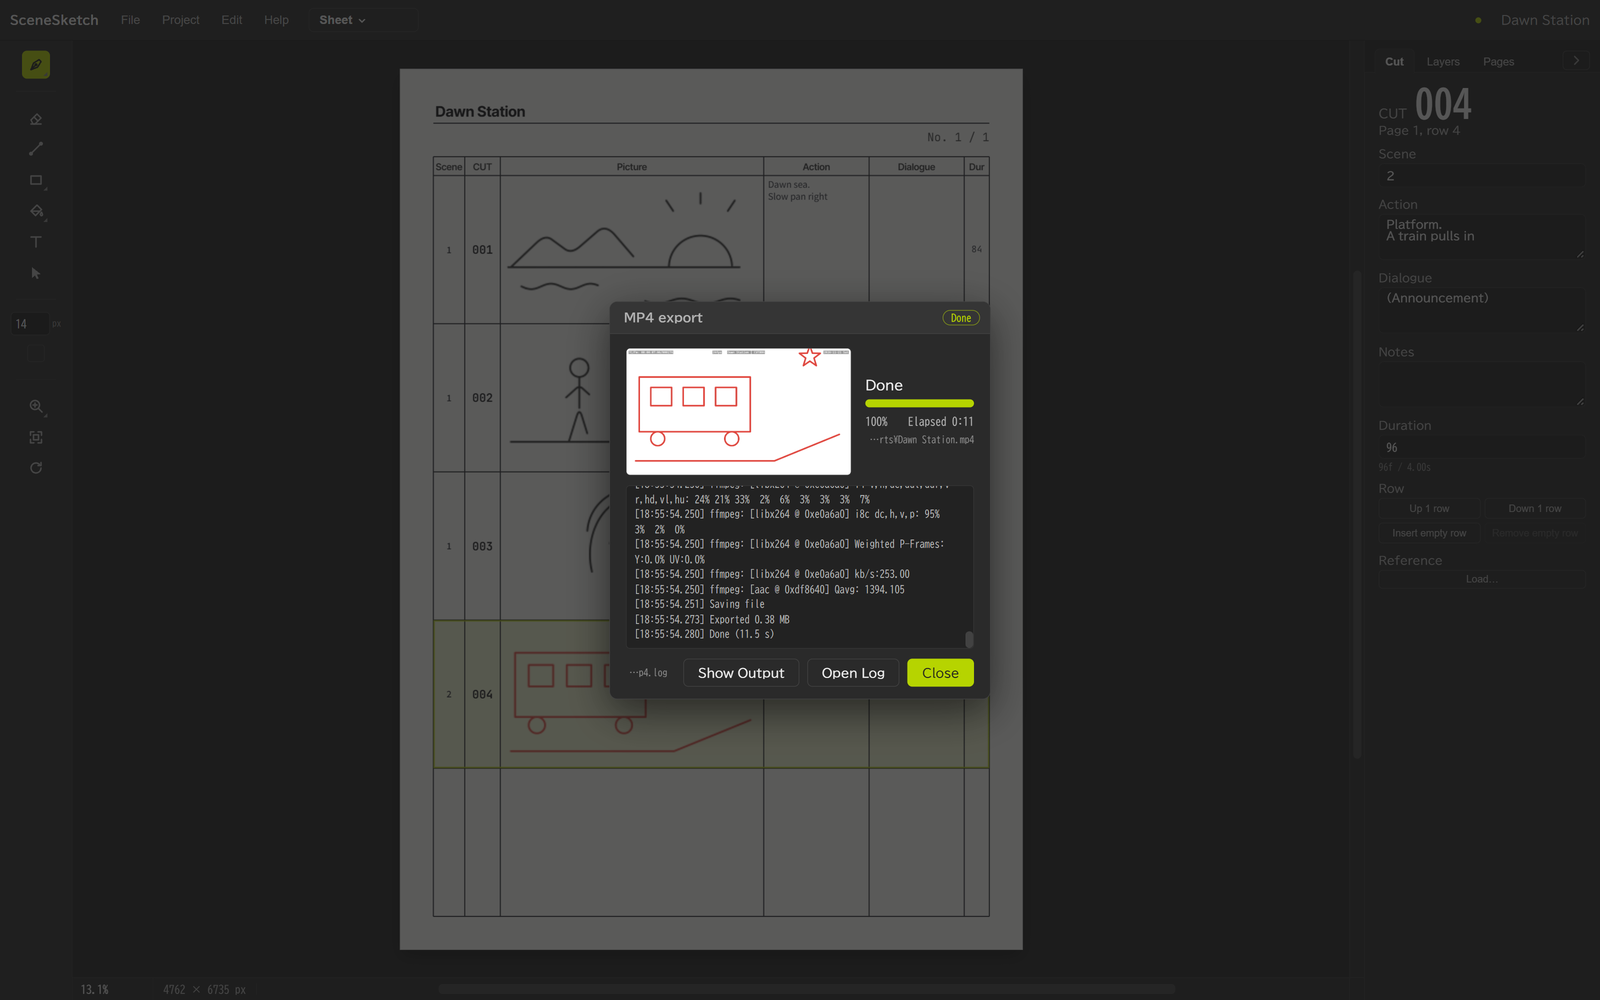
- Show Output — Opens the location of the exported file
- Open Log — Opens the location of the log file
- Close — Closes the panel (Enter or Esc also closes it)
9-3. When something goes wrong
If the export fails, the panel turns red and shows the error and a "Possible cause". For example:
- Another app has the output file open
- The destination folder can't be found
- There isn't enough free disk space
A log is saved to a file whether the export succeeds, fails or is canceled (the 50 newest are kept). When you report a problem, please attach this log.
<project folder>\Logs\export_<date-time>_<type>.log
(for an unsaved project: %LOCALAPPDATA%\com.harus.scenesketch\logs)10Sending to After Effects
This lays out your SceneSketch cut breakdown in an After Effects composition, with one comp per cut. The drawings for each cut and one audio track are sent along too.
10-1. How to send
- In SceneSketch, choose File > Export > Send to After Effects… (if you haven't saved, the project is saved first)
- After Effects starts (or stays as it is if it's already running), and the "SceneSketch → After Effects" dialog appears. The dialog uses the same language as SceneSketch
- Choose the Master comp. The comps in the project are listed. Choose "New comp" to create one with the SceneSketch project name, size and fps (use this when there are no comps, too). If you've sent before, the comp you used last time is selected from the start
- Choose whether to include the drawings and the audio, then click "Import"
"Send to After Effects" always uses the newest import script.
10-2. What happens in After Effects
- A comp is created for each cut (
CUT_01CUT_02…) in the01_mainfolder and laid out in the master comp you chose. Each gets 30 frames of handles before and after, with IN / OUT markers - Each cut comp includes that cut's storyboard drawing as a guide layer (
Storyboard). Because it's a guide layer, it doesn't show up in renders - At the very top of the master comp, a
<name> Storyboardcomp, with the drawings laid out on the cut timings, is added as a guide layer (the comp itself is created in theSceneSketchfolder). If it's in the way, hide it with the eye icon (it stays hidden when you send again) - The audio goes at the very bottom, starting at 0 seconds. Only one audio track is sent: the top-most one that isn't muted. The volume set on the timeline is applied to the audio's Audio Levels. The imported drawings and audio are gathered in the
SceneSketchfolder
10-3. Sending again after changes
- When you change the cut breakdown, send it again. For cuts that already exist, only the duration, position and drawing change; the contents of the comp are kept
- Comps for cuts you deleted in SceneSketch aren't deleted. They're moved to the
_removedfolder - Cuts are matched by an internal ID, not by name. Renaming a comp doesn't break the link
- If you choose a comp whose fps differs from SceneSketch, the import stops without importing anything
- You can choose which version of After Effects to use in Edit > Preferences… (by default, the newest version installed)
10-4. Importing manually (when using After Effects on another PC)
- Choose File > Export > Export for After Effects (Import Manually)…. The files are exported to the project's
AfterEffectsfolder - Take the whole
AfterEffectsfolder to the PC with After Effects - In After Effects, choose File > Scripts > Run Script File… and select
SceneSketch_CutSync.jsx - Select the
.cutlist.jsonfile, and the same import dialog as in 10-1 appears
10-5. After Effects scripts
You can install a script in After Effects so that SceneSketch_CutSync is available from File > Scripts in After Effects ("Send to After Effects" works without installing it).
- If it isn't installed yet, "Scripts are not installed" appears at the top of the start screen. Click "Install" to install it (Windows asks you to confirm once). You can also install it from "AE Scripts" in Preferences
- When you update SceneSketch, if the installed script is an older version, it's automatically replaced with the new version when you start the app
- If it couldn't be replaced automatically, "The script is an older version" appears at the top of the start screen. Click "Update" (Windows asks you to confirm once)

11Preferences
Open it from Edit > Preferences….
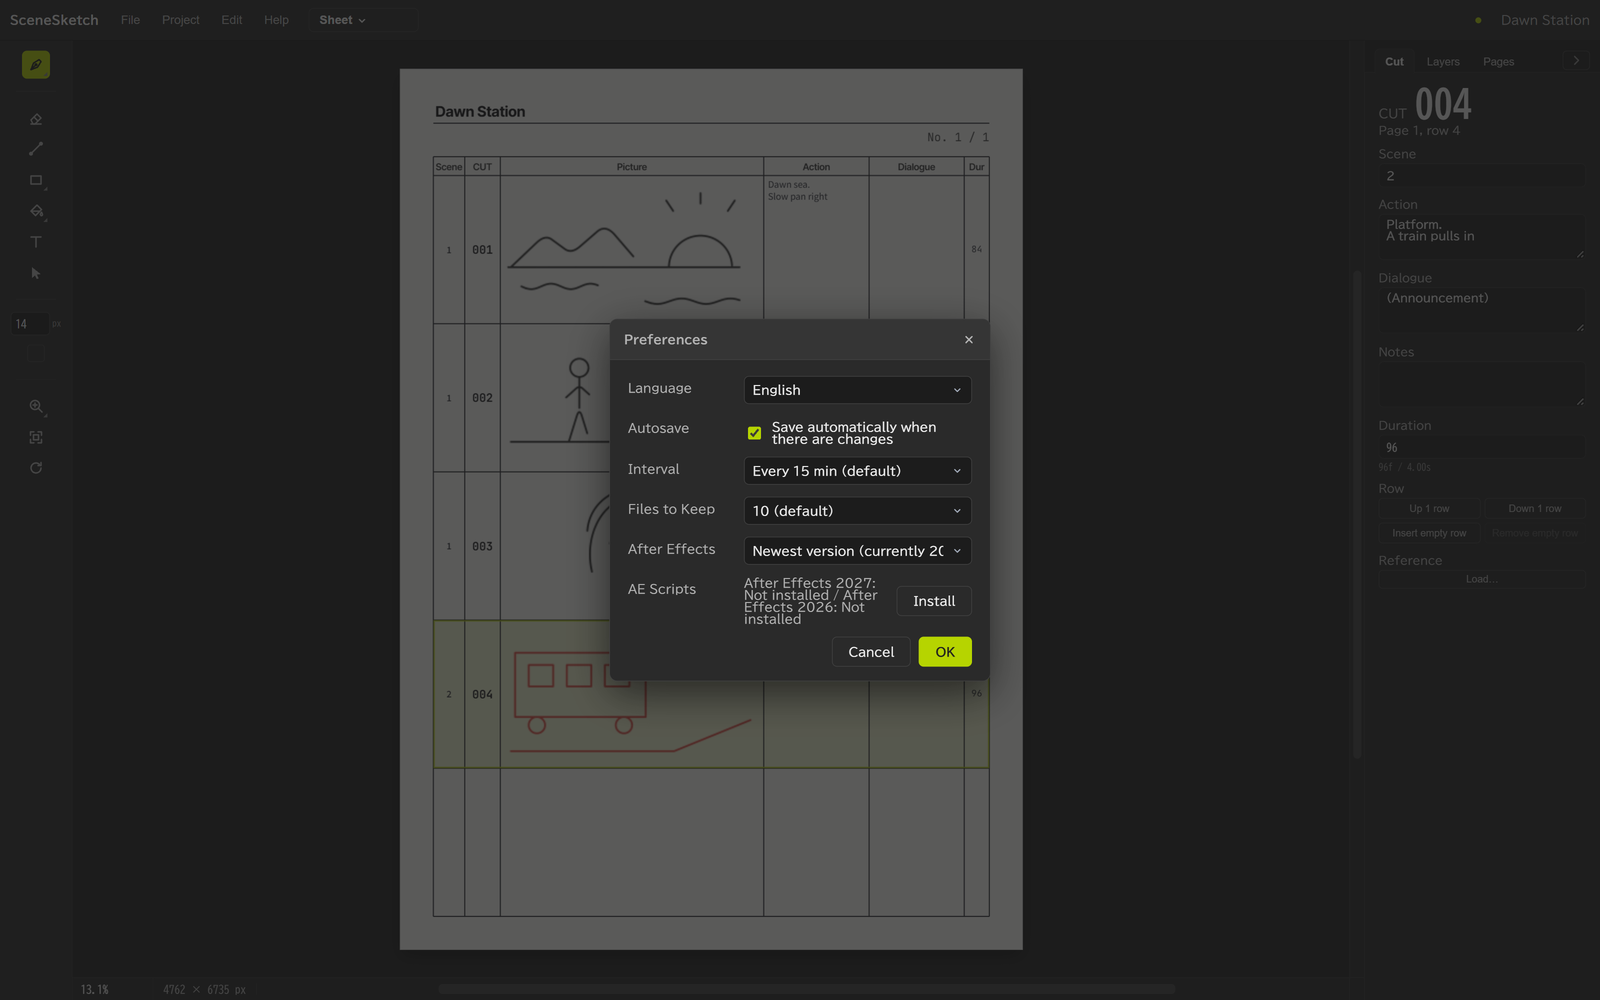
| Item | Details |
|---|---|
| Language | The UI language (日本語, English, 한국어) |
| Autosave | Whether to save automatically when there are changes |
| Interval | How often to autosave (default: every 15 min) |
| Files to Keep | How many autosaves to keep (default: 10) |
| After Effects | The version of After Effects to send to (default: the newest version) |
| AE Scripts | Whether the After Effects script is installed. Click "Install" (or "Reinstall" if it's already installed) to install it |
12Keyboard shortcuts
Use Help > Keyboard Shortcuts… (Ctrl+/) to see all the shortcuts.
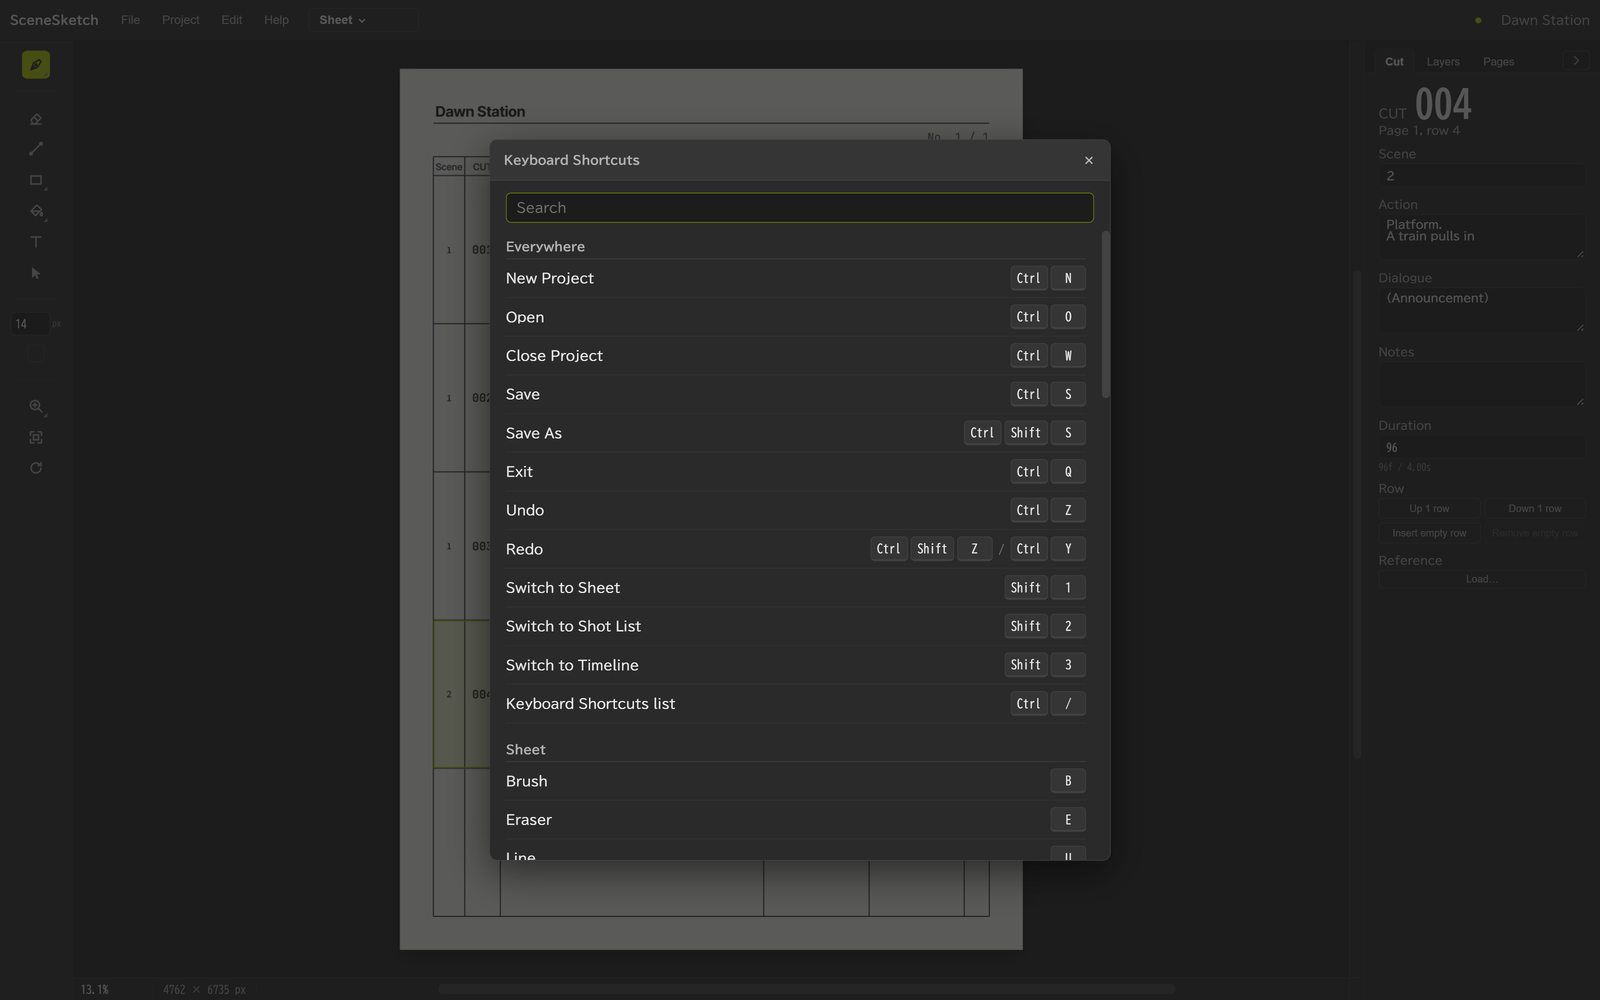
Type a word in the field at the top to filter the list (for example, "source").
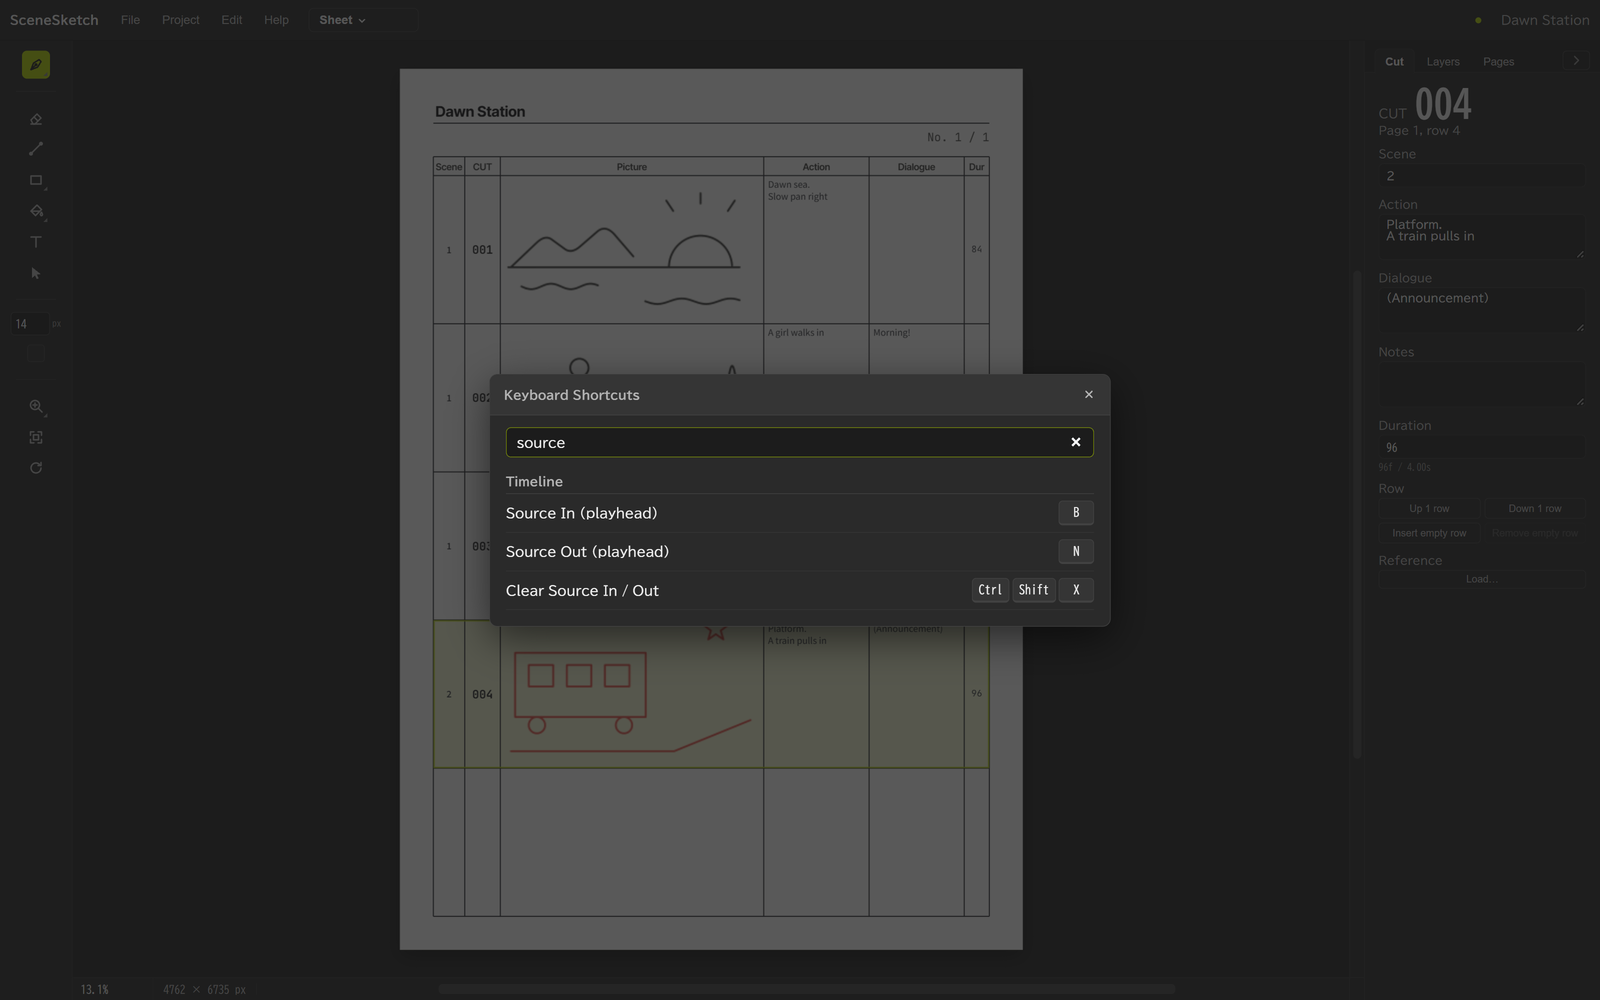
Commonly used shortcuts:
| Key | Action |
|---|---|
| Ctrl+N | New Project |
| Ctrl+O | Open |
| Ctrl+S | Save |
| Ctrl+Shift+S | Save As |
| Ctrl+W | Close Project |
| Ctrl+Z / Ctrl+Shift+Z (Ctrl+Y) | Undo / Redo |
| Shift+1 / 2 / 3 | Sheet / Shot List / Timeline |
| B / E / U / Q / G / T / V | Brush / Eraser / Line / Shape / Fill / Text / Select (Sheet) |
| Z / R | Zoom Tool / Rotate View (Sheet) |
| Ctrl+0 | Fit to Window (Sheet) |
| Space | Play / Stop (Timeline) |
| B / N / Ctrl+Shift+X | Source In / Source Out / Clear Source In / Out (Timeline) |
13FAQ
Q. Can I use it without an internet connection?
Yes. You only need the internet for the first activation (or to start the trial). After that, you can work offline until the activation expires (30 days, renewed each time you go online).
Q. I see "This key is already in use on 2 PCs".
Open SceneSketch on the PC you no longer use, click "Deactivate This PC" in Help > License…, and then activate again. If you no longer have that PC, contact the distributor.
Q. What happens to cuts without a duration?
On the Timeline, in MP4 and in After Effects, they're treated as 2 seconds for now. When you export for After Effects, a list of cuts without a duration is shown.
Q. Durations show as numbers like "84". I want to see seconds.
Each time you Ctrl+click a duration field, it switches frames → timecode → sec+frames (4-6).
Q. Where do imported audio and reference images go?
In a saved project, they're placed in the project folder's Audio and Refs folders as soon as you import them, with their original file names. If the same name already exists, something like " (2)" is added. In projects made with an earlier version, audio and reference images are renamed to their original names the next time you save (8-2-1).
Q. Where did the page list below the sheet go?
In 0.4.4, it moved to the "Pages" tab of the right panel (4-8).
Q. Where did the "Notes" column on the sheet go?
It was removed from the sheet columns in 0.4.1. You can enter notes in "Notes" in the right panel and in NOTES in the Shot List. Notes you wrote before are still there.
Q. Where did the "duration strip" below the sheet go?
It was removed in 0.4.0. Matching durations by eye and playing them back is done on the Timeline.
Q. The app says CUT001, but After Effects says CUT_01.
The app uses the storyboard style (3 digits), and the After Effects side uses a different style. Cuts are matched by an internal ID, so the different styles don't affect the link.
Q. I sent to After Effects, but the import dialog doesn't appear.
SceneSketch waits for After Effects to start before sending, so if it was closed, it takes about a minute. If an Adobe sign-in or license screen is showing, take care of that first. If "Allow Scripts to Write Files and Access Network" is turned off in After Effects Preferences (Scripting & Expressions), the wait gets longer.
Q. SceneSketch_CutSync doesn't show up in the After Effects scripts menu.
Updating After Effects can remove the script. Click "Reinstall" under "AE Scripts" in Edit > Preferences…, then restart After Effects.
Q. Pressing F5 doesn't reload the screen.
F5, Ctrl+R and similar keys are disabled so you don't lose a drawing in progress.
Q. When I open the installer, it says "Unknown publisher".
That's because there's no code signing certificate. If you got the file from the distributor (Nemoharu Creative), click "More info" → "Run anyway" to continue.
Q. I want to uninstall it.
First click "Deactivate This PC" in Help > License… (this frees up one of your PC slots), then uninstall SceneSketch from Settings > Apps in Windows. Your project folders are not deleted.
Q. Can I use it for commercial work?
Yes. You can use it for personal and commercial work, and you own the rights to what you make. For details, see the Terms of Use.
14Troubleshooting
- An export doesn't work → Click "Open Log" in the export panel to open the log (9-3)
- The screen went white / the app suddenly stopped → Choose Help > Open the Error Log to open the location of the log (
error.log). This log stays only on your PC and is never sent anywhere - When you report a problem, please attach these logs
Terms: SceneSketch Terms of Use (in the app: Help > Terms of Use…)